Tutorial - Eyebrows & Face
Eyebrow tutorial with photos & text-only “tutorial” of how I apply my face makeup and powders.
Skill Level: Beginner

Supplies: Expresso eyeshadow (use the shade that correctly matches your brows!), thick angled brush (like the 266), thin angled brush; moisturizing before with a facial cream is also a good way to help get the powder shadow to stay on longer (wait for the moisturizer to dry for the most part, though!).
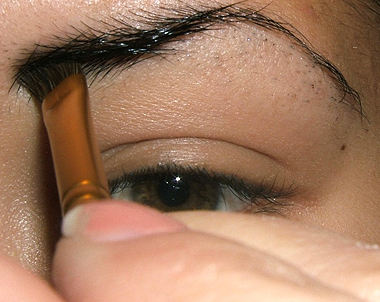
Using a thick angled brush, pick up the brow color and begin filling in the thickest part of your brows (or the innermost portion) by starting at the top.
Blend outwards and upwards, make sure to repeat only starting at the bottom instead of the top.
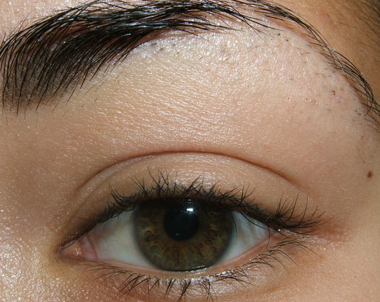
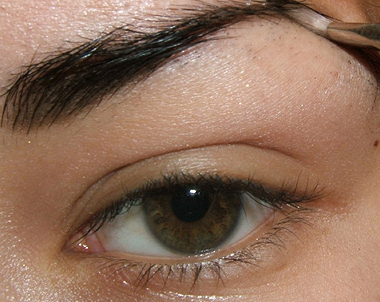
Your results…
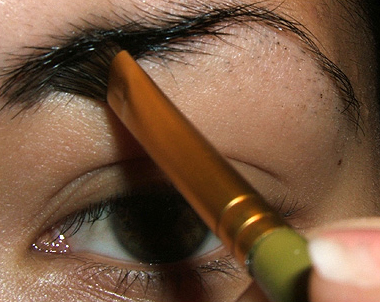
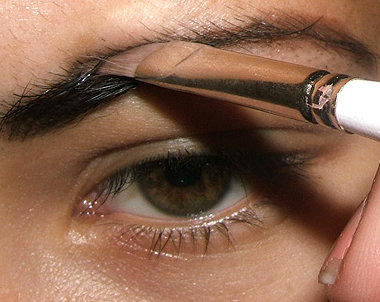
Using a thin angled brush, pick up the brow color and place directly under the portion of your brow that may need slight darkening. For me, it is just past the thickest part of my brow.

Move your brush along the underside of your eyebrow upwards and outwards.
Continue along the tail of your brow until you reach the end of your brow.
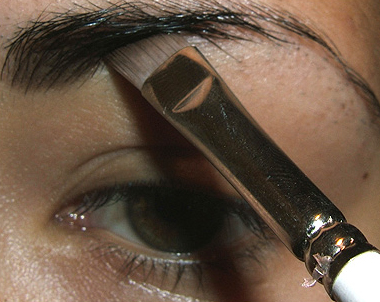
Repeat the process as before, only along the upperside of the brow following it until the end of the tail part of the brow.
You should get something that looks like this. This is a tad messy, and when you do your eye makeup, your highlight helps bring it altogether in the end 🙂 It is also a good idea to take a clean mascara wand to help straighten out your brow hairs so they look all clean and proper!
Face Tutorial
Foundation: Apply your foundation using a fluffy brush, whether it be the 182, 187, or a blush/powder brush. This works best with liquid foundations, not powder or pressed ones. You can use either your fingers or the brush itself to pick up the liquid foundation and apply it to your face in a series of “spots” or “streaks” that will later be blended out. I usually apply a bit to each cheek, my chin, and the middle of my forehead. If you use a brush like the 187 that is not as easy to blend in circles as the 182, the best method is to stroke sideways and at an angle. I find that the 187 gives some “streakage” around corner areas like the nose and underneath the eyes, so I end up using my fingers to blend these areas at the end. The 182, however, allows you to blend in a circular motion, as well as to the sides, and it eliminates most of the need to do any last-minute finger-blending at the end.
Contouring: I only contour the hollows of my cheeks because I’m fairly happy with the thick/thinness of my nose. I do this by sucking in my cheeks and making a fish face (attractive, I know). I use an angled fluffy brush and pick up bronzer and apply my contour line a little after the hollow begins by my mouth and brush it along the emphasized hollow to your ears. If you do not plan to put any other color on your cheeks/face, you can easily blend this out using a fluffy powder brush (my favorite is the 182). Otherwise, leave the line as it is, as unblended as it appears.
Blush: I use a fluffy blush brush and pick up the blush color and apply to the apples of my cheeks. You can figure out where your “apples” are by smiling real big. You’ll apply the color there and pull it towards your temples. After this, blend it downwards towards the contour line with what residual color is left on your brush. I usually only pick up color once or twice, and the bulk of it ends up on the apples of my cheeks. You can easily blend the two colors by placing the brush so that it touches both of them at the lowest point (closest to your mouth) and pulling your brush upwards along both of them towards your ear. You can swish the brush sideways as you move upwards to facilitate blending, as well. I prefer to take the 182 for the blending procedure after the color has been applied, because it is supremely amazing when it comes to rounding everything out.
Highlighting: I usually highlight using some sort of pigment (like Pink Opal), and a good brush to apply this is the 182, but also the 187. The 187 has special bristles that allow for a very light application, so you can get the highlight color to fall just over the apples of your cheeks and by your temples without much trouble. Again, smile really big, and notice the apples of your cheeks. You want to apply the highlight color just above the apples, basically just before they flatten out at the top, but before the space underneath your eye begins.
I love this site and I find your tutorials great… thanks for this eyebrow section mine always look terrible and boring could I just use a lip brush for it because I don’t have a angled brush. Well until I buy one that is… =] thanks, Caitlin xox
Go on my site please… http://www.lilmisspenguin.piczo.com
I’m glad you enjoy the site, Caitlin! Whatever brush you have on hand… if it works, it works 😉 Doesn’t have to be the same as what I use!
Thank you so much for posting such wonderful tutorials! You are very talented. I´ve always been afraid to attempt anything other than tweezing with my brows, but I grabbed a mirror, some moisturizer, an angled brush and Mac coquette, and now see what I´ve been missing! I didn´t even have any other make up on, and it just made me look so much more polished. It looks awesome. Thanks again!!
Thank you!
I’m so happy it worked for you. I didn’t fill in my brows for a LONG time myself, and I decided to try it one day and WOWZA! Half the time, even if I don’t put ANY make-up on, I’ll still fill in my brows.
i love yuour site!!!
Thanks Lucy 😀
Do you shave your eyebrows?
No, I pluck stray hairs every other day. Does it look like I do? lol. I could never shave them!
How can I use bronzer to contour my face if I’m not happy with the width of my nose?
You would darken the bridge of your nose by sweeping a small angled contour brush down the sides of your nose with the bronzer. HTH!
What is you HG foundation? I am just courious b/c you mentioned in your face tut., that you wouldn’t use the 182 with pressed foundation powder… Which is exactly what I do…. I love to use the 182 with my Studio Fix Powder, and imo it works like a dream. (Although I do have to use the sponge on my nose and under eyes to get the coverage I want.) 😀 Thanks! Great work BTW!
Hi Lauren! My holy grail foundation is MAC’s Studio Fix Fluid 🙂 I’m really happy to hear it works with the powder! I’ve never really tried using the 182 on a powder foundation (since finding liquid, I can’t go back), but I just didn’t imagine it would work well so I’m happy to stand corrected!
Hi Christine!
Thanks for the great tutorial on how to apply face makeup =)
Just wondering if you woudl consider doing a tutorial on how to apply false lashes in the future, that would be wonderful, thanks!
Hi Meme! Anything to help 😀 Oh, if only I could master false lashes, I would! I still can’t seem to get the hang of them whatsoever. I promise if I ever discover how to do them perfectly, I’ll share the knowledge.
hi, can yo u advise on how to wear concealer… i have very dark rings, inherited…everytime i wear it looks grey on the picture. thank you
Try using a concealer without SPF. You may also want to try an eye brightening stick. Benefit makes one, and I think Smashbox does as well!
your brows come down to far..they bring the corners of your eyes down
Sorry you feel that way!
Hi Christine!
I know you siad that you are happy with the “thick/thinness” of your nose. But how would you contour your nose??
You would use a small angled brush and darken the sides of your nose and the nostrils, very lightly though. You can highlight the very top of it, too!
Oh Thanks! I wanna try one day!=)
My pleasure, Sash! 😀 Hope you do!
hello christine….. i just wanted to ask….. is it a good idea to fill in ur brows. even if its hot and too too humid outside?
To be honest… yes, as long as you won’t sweat it off too bad. I would recommend using a powder and setting with like Clear Brow Set, though!
your eye brows are beautiful and perfect i like them very very much really…
Thanks, Eyrie!
i love your eyebrows!
my eyebrows are just horrible & thick.. i’m not allowed to tweeze or wax them..
btw, i love your site! i learnt a lot…
Thanks, Miss Anna! Aww, well, if you have an old or clean mascara wand, you can use that to brush them – and then use a little bit of hair spray (spritz it on the mascara wand) or gel (put it on the wand) and set it. Might be worthwhile for now 🙂
Hey Christine,
I have a very heavy upper lid, but my eyebrows are very nice (I think 😉 and I have a pretty arch in my brows. Its just the upper lid is, for lack of a better word, “fat”. My shadows never go on they way I think they should. Would you use the same shading techniques for this type of eye? Also, I have very dark circles under my eyes, and I use a yellow tinted conceler, but it just doesn’t make them go away. Do you have a magical trick your sleave for this dilema?
thx! – Courtnie
Hi Courtnie,
I love YSL Touche Eclat for undereye concealers–it’s REALLY fantastic and easier to get than my other fave (Kanebo Brush-On Concealer). As far as eyeshadows go, do you mean you have a lot of “lid” space?
Woww.!Yur tutorial works very nicee. Bt hey do you know how to do hta multi colred eyeshadow thing on your eyes. plz & thxs.
Thanks, Beza!
What do you mean multi colored eyeshadow thing?