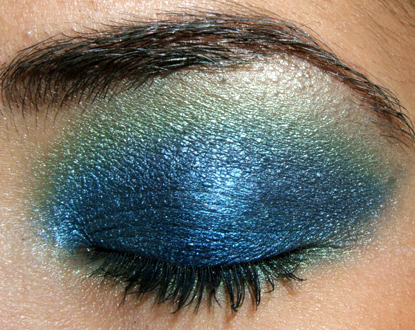
Tutorial - Very Bold Blue For A Night Out

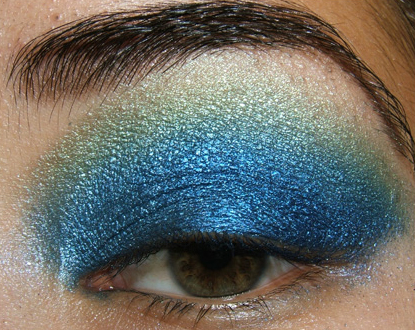
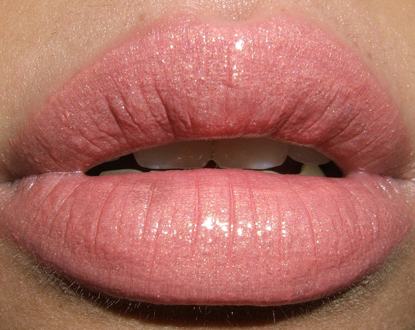
I used Blue pigment (LE) on lid, Sea & Sky mineralize eyeshadow (marbled side) (LE) on inner lid, Sea & Sky mineralize shadow (colored side) (LE) on lid, Contrast eyeshadow on outer crease, Gorgeous Gold eyeshadow above crease, Nylon eyeshadow on brow bone to highlight, Sea & Sky mineralize shadow (colored side) (LE) on lower lash line, Gorgeous Gold eyeshadow layered on lower lash line, Graphblack technakohl on lower lash line, and Plushlash mascara on lashes. I had Deep Dark mineralize skinfinish duo on cheeks. I wore Sandy B lipstick and Illicit lipglass (LE).
** These are recommendations for dupes based on permanent colors available – may not necessarily be identical; they are the closest I can think of!
Blue = Freshwather; Sea & Sky = Tilt; Sea & Sky = Freshwater; Illicit = C-Thru
Now, get step-by-step directions on how to get this look for yourself!
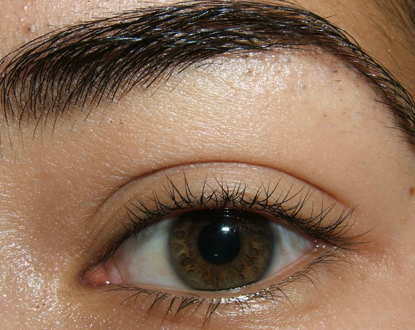
1. Start with a bare eye.
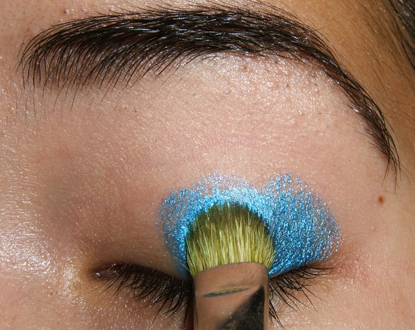
2. With the 239, wet brush with a few drops of water-based mixing medium and pick up Blue pigment and apply to lid.
3. This is what you should have.
4. Apply Sea & Sky (marbled side) eyeshadow using the 239 brush on your inner lid.
5. This is what you should have.
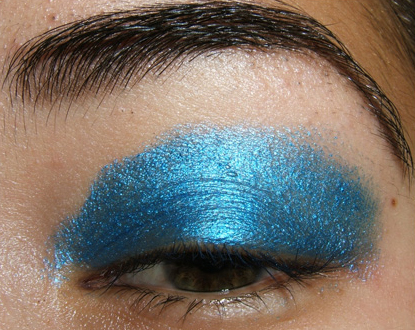
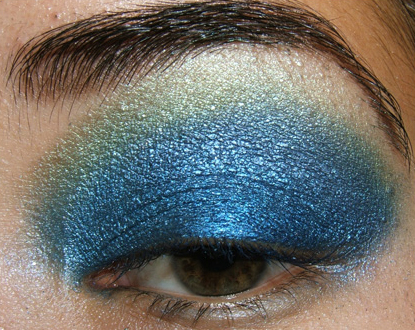
6. Apply Sea & Sky (solid side) eyeshadow using the 239 brush on your middle lid.
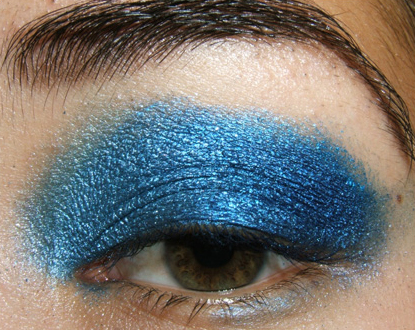
7. This is what you should have.
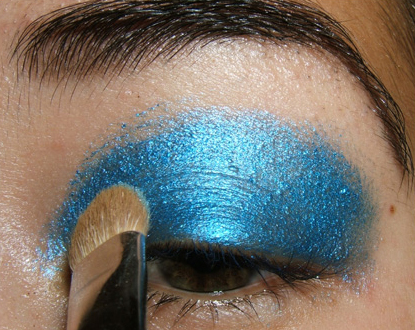
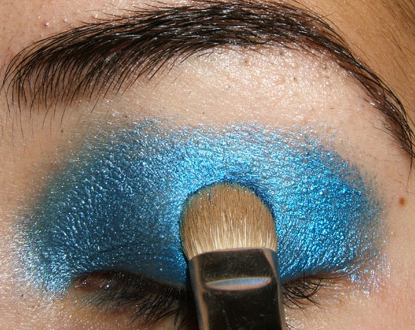
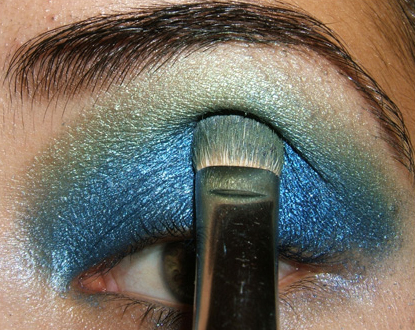
8. Apply Gorgeous Gold eyeshadow using the 239 brush above your crease.

9. Sweep brush outwards.
10. This is what you should have.
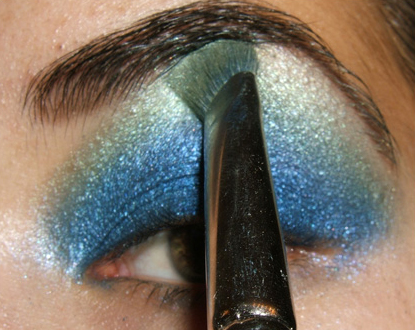
11. Apply Contrast eyeshadow with the 239 brush in your outer crease.
12. This is what you should have.
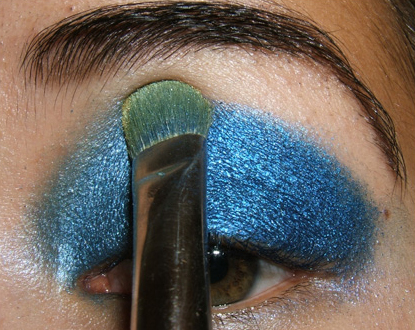
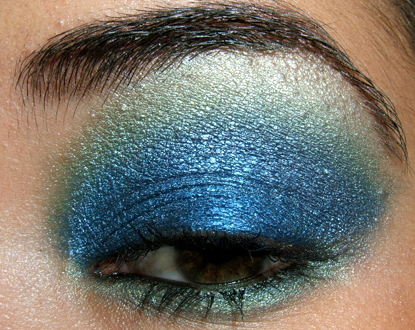
13. Apply Nylon eyeshadow using the 239 brush to highlight the brow bone.
14. This is what you should have.

15. Apply Sea & Sky (solid side) eyeshadow on lower lash line.
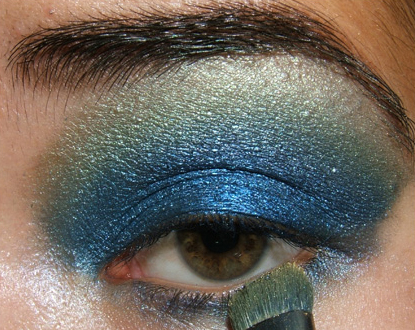
16. Apply Gorgeous Gold eyeshadow on lower lash line.

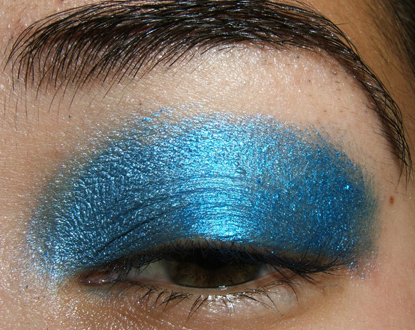
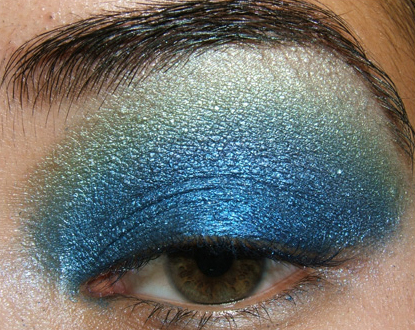
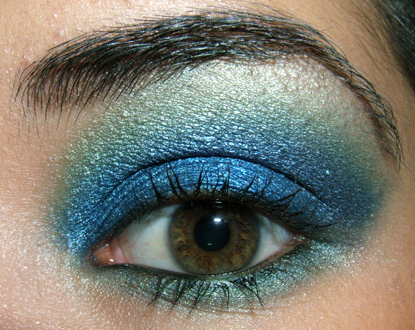
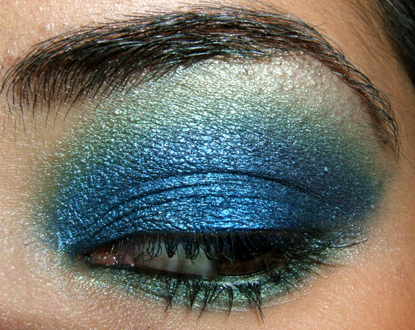
17. This is what you should have. Add black liner and mascara of your choice to finish.


This is a very pretty look, thanks for making the tutorial Christine. Now, I returned my Sea and Sky coz I didn’t think it worked like I hope it would (though it looks pretty), but I think I can still make this look. I have all the other colors 🙂
Sure thing, Sandy 🙂
very pretty
i sooo love everything with blue and teal eyeshadows
thx for posting
No problem, Claudine!
Very vibrant and bold. Pretty. I also love the tutorials! Thanks, Christine.
My pleasure, Reesa!
I love it. I’m so glad you’re putting more tutorials and looks up…. they’re my favorite thing about your blog.
Thanks, Kristen! I’ll try to put more up!
Very pretty! I love a dramatic look for a night out.
Thanks, Pretty N Pink!
Very pretty Christine! You rock blues very well and thanks for the tutorial!
Thanks, Vanessa!
I love it! I haven’t been schooled on the whole pigment thing yet (as if I need another MAC product to get addicted to…that’s why I’ve held off on using them!) but I bet if I used all of the products apart from the pigment it would be a bit less intense? I’ll have to try it, just got Sea & Sky yesterday…and here I was trying to save up for the Cherry collection.
Hi Elle,
If you have a good base, you should be fine! Sea & Sky is very intense on its own. 🙂
Pretty! I wish I had more MAC so I could try this exact look.
Thanks, Trisha! You could probably get this with other brands, I’m sure!
Sooo stunning!
Thanks, Ce!
Wow,love it!!!!!!!!!!!!!!!!!!!!!!!!!!!!!!!!!
love these jewel tones in makeup,clothes everything!!!!!!
my question: this Blue pigment is very gorgeous,it was LE?
it was a long time ago? i want to geeeeeeeeeeeeeeeeeeeeet it 🙂
Thank you so much! Yes, it was LE – maybe 2 years ago or so?
Sea Me shadestick is very similar, though!
This looks amazing!
I’m glad i bought Sea & Sky now.
Thanks, Dainty! What do you like to use Sea & Sky with?
omg thanks SOOOOO much for doing a tut on this!!! this looks AMAZING!!!!
Sure thing, Tanya!
Thanks Christine! I really liked this look you did. I got Sea & Sky, but haven’t used it yet. I gotta try this.
You’re welcome 🙂 I hope you get to try it!
This look is gorgeous! Thanks for doing more tutorials I love them, they inspire me!! I noticed you’re really loving Sea & Sky.
Thanks, Amanda 🙂 It’s pretty, though I haven’t used it since this tut!
thank you for giving the step-by-step pics!! soooo helpful!!
My pleasure, Mo!
i love the way you broke it down!!!! the blue is fab!!!!
Thanks, Lish 😀
THAT IS HOT!!!
Thanks, melovemaclongtime!
THANKS for the tutorial! !Love them! they teach me so much!
Sure thing, Calico!
This looks incredible. I love the details on your tutorials because not only do you do a step by step on how to achieve the look you also show a full facial picture to show ho it looks all together. I love bold colors but I have to admit when I saw this color I said it looks beautiful but it’ll be too much. When I saw the picture of the full face i realized it’s bold but not at all over the top. It looks great on you!!!!
I see that the blue pigment is a limited edition…does mac no longer sell it? I tried to look for it but I didn’t see it anywhere?
Thanks again. Can’t wait to see the next tutorial you post.
Hi Crystal G.,
Thanks so much! Yep, it can easily look WHOA! in the close-ups, but it’s usually much less OTT when you see it come together 🙂
Blue was limited edition, so it’s not available anymore. You can try Sea Me shadestick instead – it’s very much the same!
The colors look so beautiful on you I don’t take your tutorials for granted it is truely appreciated when you post new ones I look forward to you posting more soon Thanx
Thanks so much, Diana 🙂
This is one of the most striking looks on you!! Absolutely gorgeous. You should really do bold colors more often 😉
Aw, thanks, Dana! 🙂 I’ll try!
hey! i just ran into your blog today…wow your really great w/ make up (this is hands down your best look btw)
are you a professional if not you should be! do you sell samples? if your ever in the houston area i would love for you to do my make up! keep up the good work!
tassia
Thanks, Tassia! I don’t sell samples, unfortunately!
I do makeup on the side on occasion 🙂
can you do this with a redish-pink and a gold shadow combination? how would i go about combining those? i also have various pinks and light purples from urban decay
Hi Sydney,
I’d put the gold shadow on the lid and put the reddish color in the crease!
hi! i just found out about your website and i love it! i have always been wondering how these looks are created. one question, how do you apply eyeliner after the eyeshadows? when i apply eyeliner afterwards, i have to lift my eye with my finger and that smudges the eyeshadows…how do you do it?
Hmm, I don’t have to use my fingers to do that. You could try a q-tip, it might smudge less for you!
Wow that’s lovely.
I have chocolate colored skin, I wonder how that would look on me.
Thanks, thelauryndoll!
I think this would work well for you!
do you wet your brush with the mixing medium every time you use another shadow or just the one time in the beginning?
Just when I use it with a loose pigment!
I love your makeup tutorial Christine. It really helps me to do this makeup when I’m going out to a party, or just for fun, or even on vacations. And I really like the way how you apply it on, by just taking your time. It really does come out nice, and very pretty. And I also like the Vibrant Colors you apply it on 🙂
<3 Luvv it 😉