Tutorial - Super Smoky Black, Green, and Gold Eye
This tutorial is designed to show you step-by-step how to create a dramatic super smoky green and gold eye look.

You will need: Emerald Green pigment (rich emerald green as a base) + water-based mixing medium*, Goldmine eyeshadow (true gold), Wondergrass eyeshadow (bright medium green), Humid eyeshadow (deep forest green), Carbon eyeshadow (matte black), Golden Lemon pigment (frosty gold), Nylon eyeshadow (frosty off-white highlighter), Blacktrack fluidline (black gel liner), Femme Noir eyeshadow (matte dark green), and Plushlash plushblack mascara (black mascara) for the eyes. For cheeks: Other Worldly blush (dirty bronze); for lips: CB96 lipstick (frosty coral), C-Thru lipglass (nude), and Reflects Bronze glitter (glittery gold-bronze).
Brushes: 208, 219, 239 x3**
* Water-based mixing medium is a PRO product sold by MAC or DIY with 1 part glycerin (liquid) + 3 parts water.
** 239 #1 will be used wet; 239 #2 will be used for most of the shadows; 239 #3 will be used for black shadow
Get the step-by-step instructions with photos…
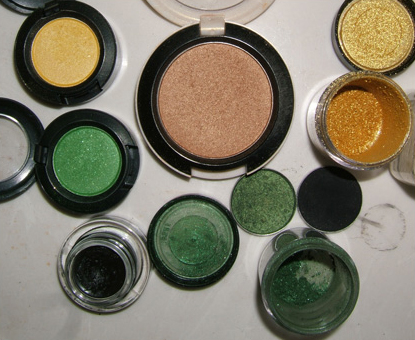
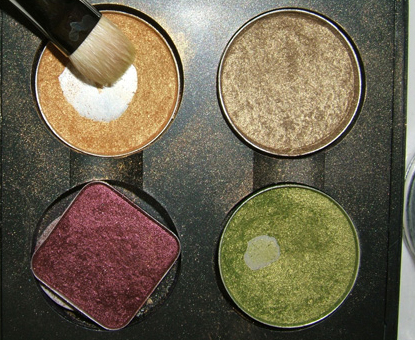
Yellow shadow = Going Bananas (oops, not used in this look!)
Green shadow = Wondergrass
Black pot = Blacktrack fluidline
Dark green shadow pan = Humid
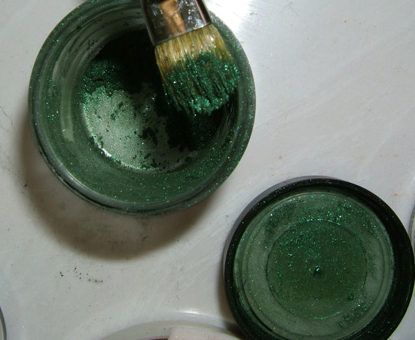
Dark green jar = Emerald Green pigment
Black shadow pan = Carbon
Gold jar = Golden Lemon pigment
Dirty bronze blush = Other Worldly

1. Start with a clean eye-space; if you fill-in your brows, you’re welcome to do them now [or later]. Ignore my stray bits of brow (just plucked!).
2. Use one of your 239s with a few drops of water-based mixing medium and then pick up Emerald Geren pigment.
3. Apply it all over your lid.
4. Pull it outwards to cover your entire lid area.
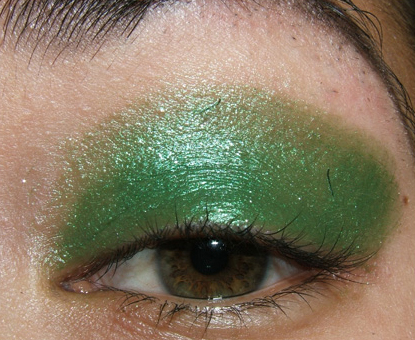
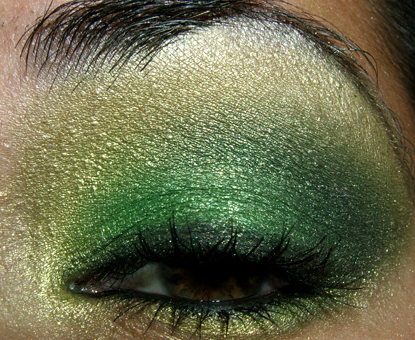
5. This is what it should look like.
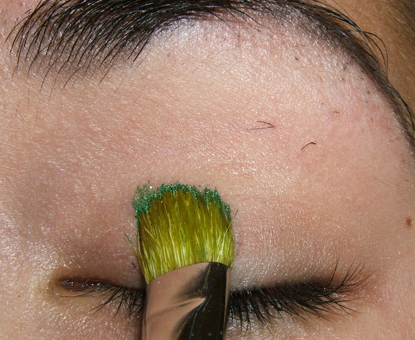
6. Pick up Goldmine eyeshadow with your other 239.
7. Apply to the very inner portion of your lid, very much near your inner tearduct.

8. Sweep it upwards above the Emerald Green pigment.
9. This is what it looks like.
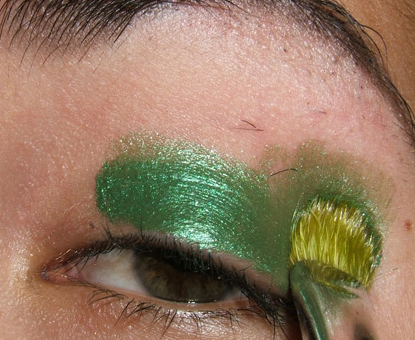
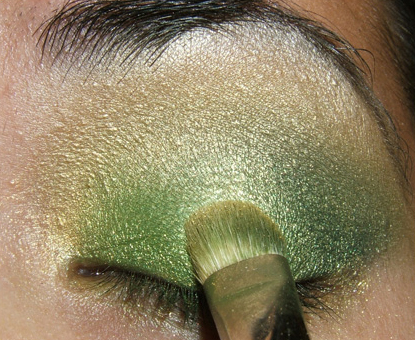
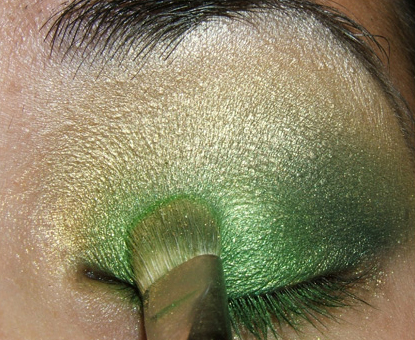
10. Apply a generous amount of Wondergrass eyeshadow using your 239 brush to the inner alf of the lid.
11. Pull outwards to even out the color.

12. This is what you should have.
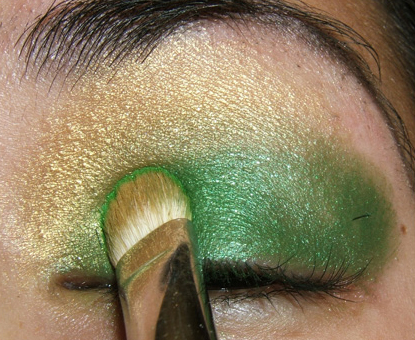
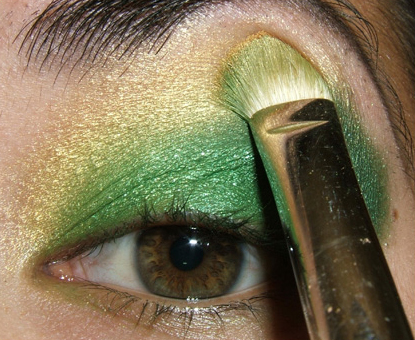
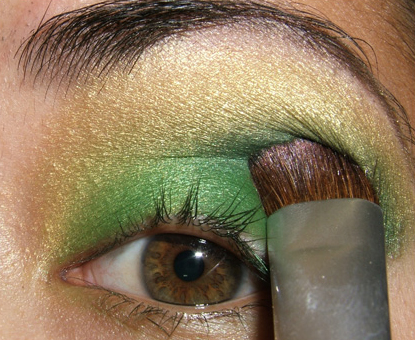
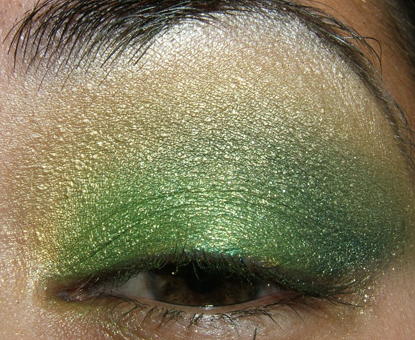
13. Apply Humid eyeshadow to the outer half of your lid using the same 239 brush.
14. Pull the brush downwards the blend the color towards your upper lash line.
15. This is what you should have.

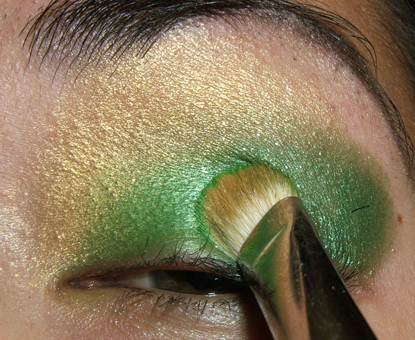
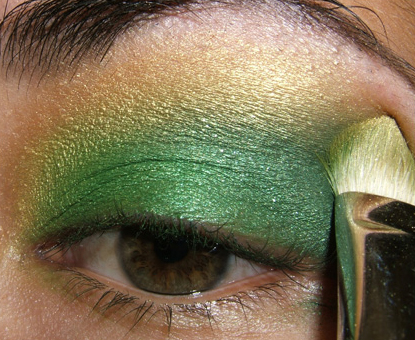
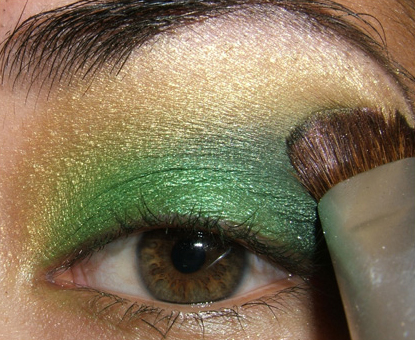
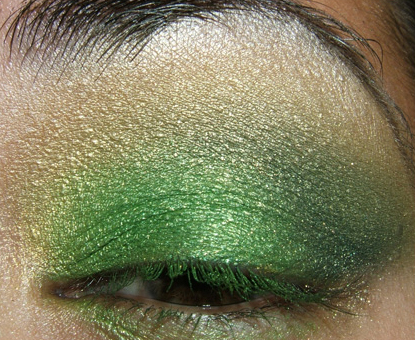
16. Apply Humid eyeshadow into the outer crease, starting about halfway on your lid.
17. This is what it looks like now.

18. Pick up more Goldmine eyeshadow and sweep over the inner tearduct and overlap just a touch of the inner lid geren.
19. Pull and sweep upwards to help blend the green and gold together.
20. This is how it looks so far.
21. Pick up additional Goldmine eyeshadow and apply it above the green line, blending the green and gold together to eliminate the harsher green line.
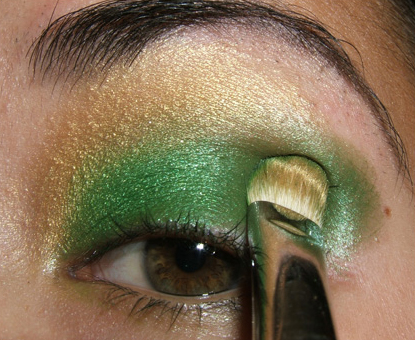
22. Pull your brush outwards to blend the colors together.
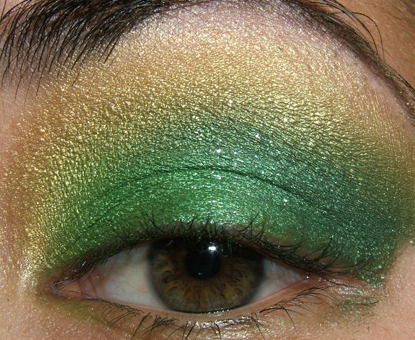
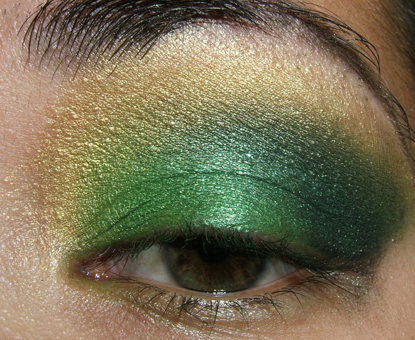
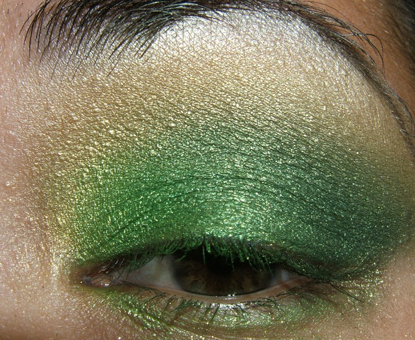
23. This is what it looks like now. Technically speaking, you could leave the look as is – we’re going to make it darker and add more gold to it overall from here on out, but it can stand alone like this.
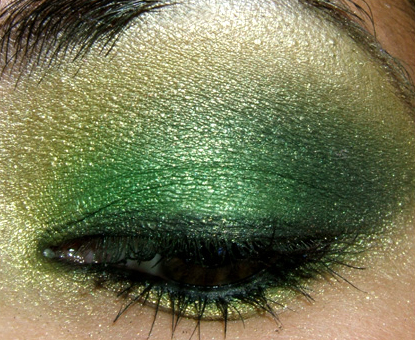
24. Using your third 239 brush, pick up Carbon eyeshadow (go light rather than heavy when doing this–you can always darken, but it’s tough to lighten!), apply it to the outer third lid.

25. This is what it looks like.
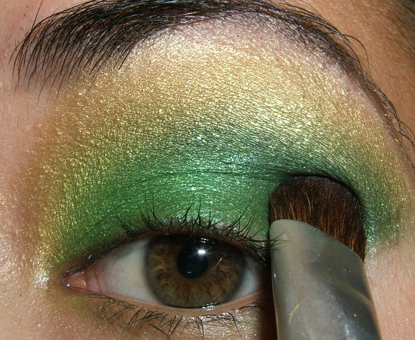
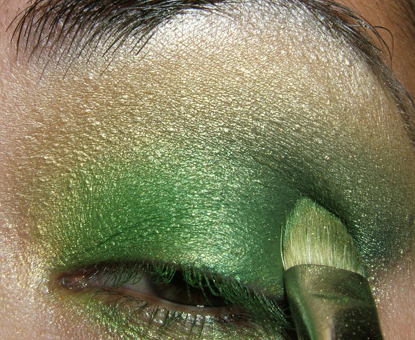
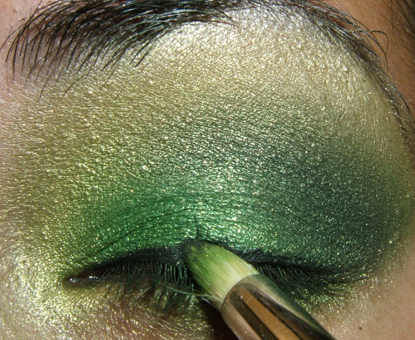
26. Apply it to the outer crease by gently tapping it into the crease.
27. Pull the brush outwards to blend Carbon eyeshadow upwards and outwards.
28. This is how it looks at this point.
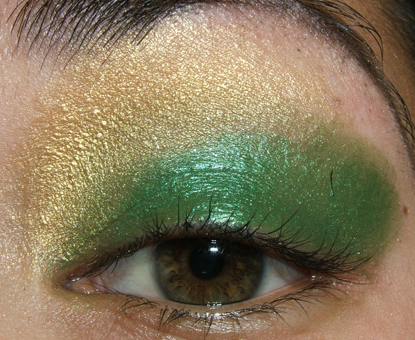
29. Apply Nylon eyeshadow to the brow bone to highlight.
30. Blend it outwards.
31. This is what it looks like here.
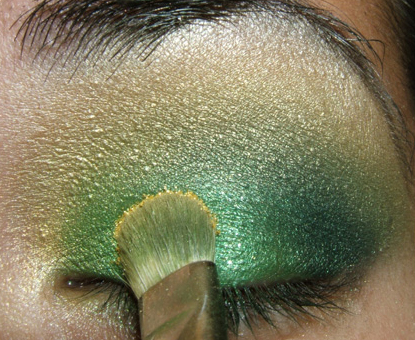
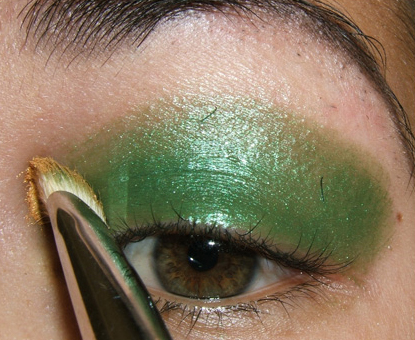
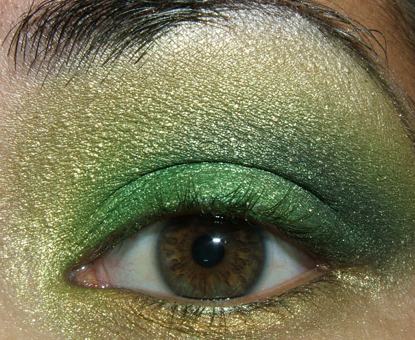
32. Using your general shadow 239 brush, pick up Golden Lemon pigment and pat it once on the inner third of your lid, then middle third, and then the outer lid.
33. This is what it looks like tapped out.
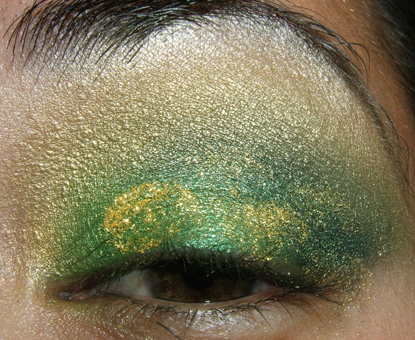
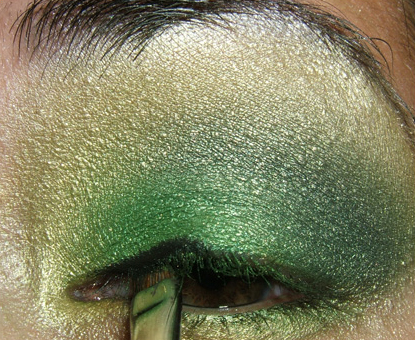
34. Sweep your brush back and forth to blend out the Golden Lemon pigment, it’ll turn a very yellow green.
35. This is what it looks like when completely blended.
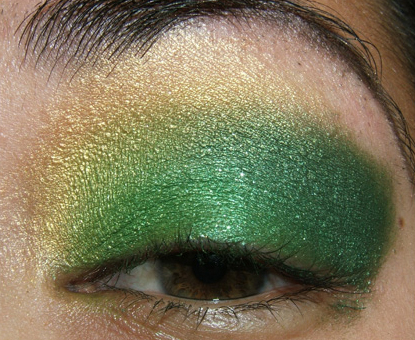
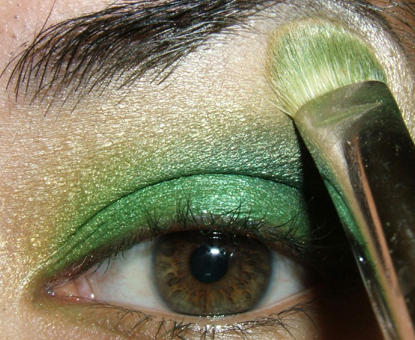
36. Apply Wondergrass eyeshadow over the inner half of the lid again.
37. This is what it looks like now.
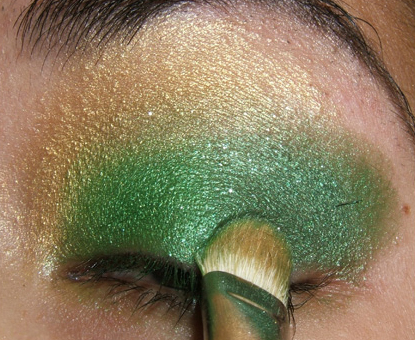
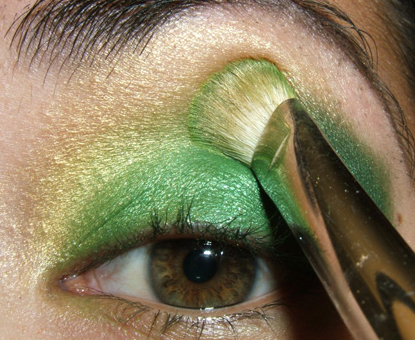
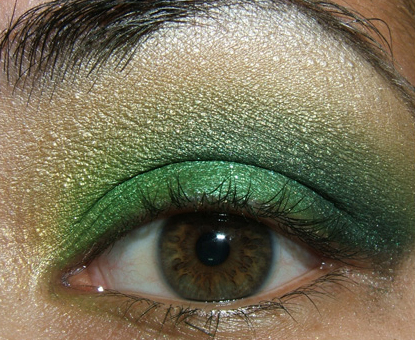
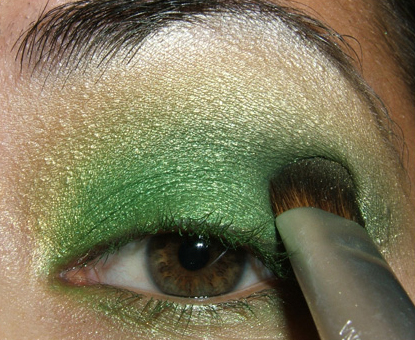
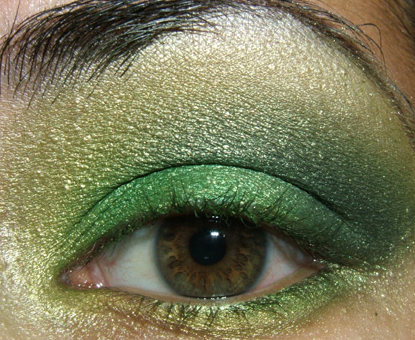
38. Apply additional Humid eyeshadow to the outer half of the lid.
39. This is what it looks like now.
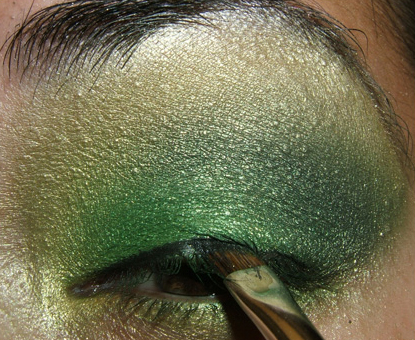
40. Tap your third 239 brush into Carbon eyeshadow and darken the outer crease.
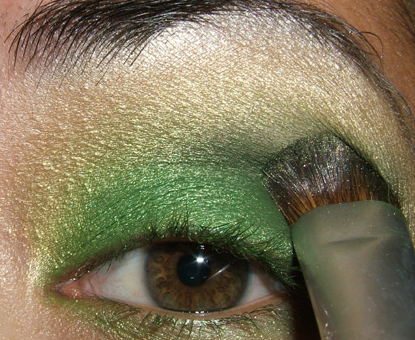
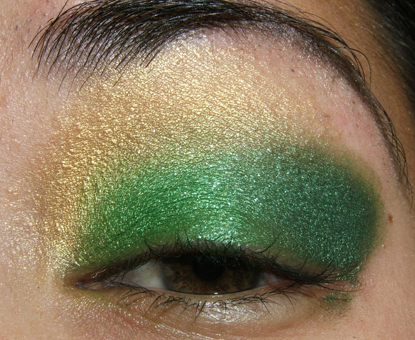
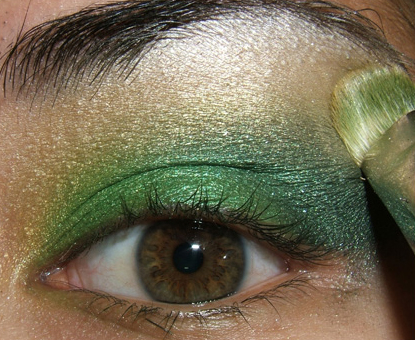
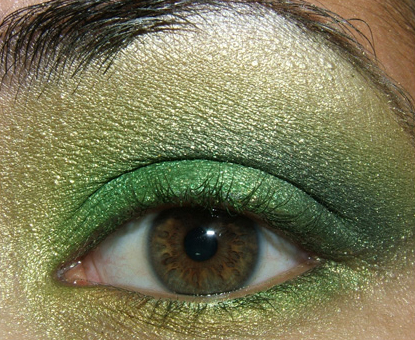
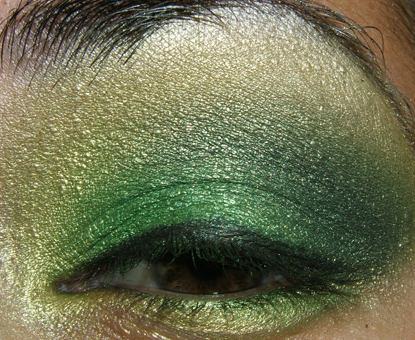
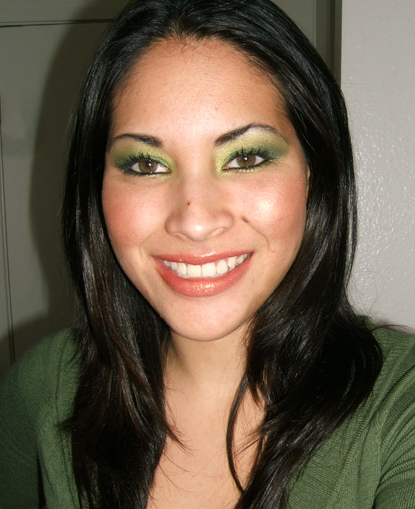
41. Blend the color outwards.
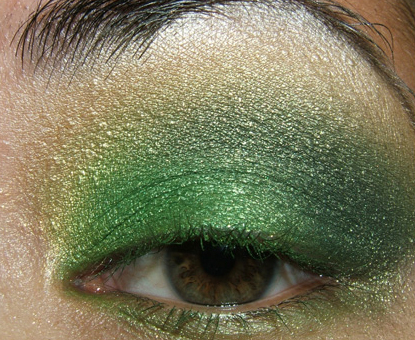
42. This is what it looks like now.
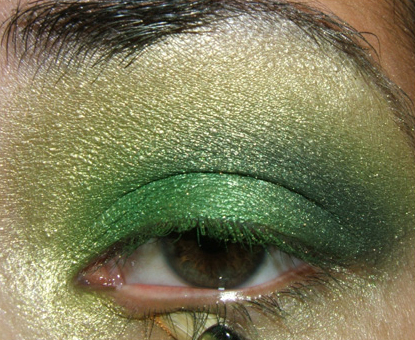
43. With the 219 brush, apply Goldmine eyeshadow to the lower lash line.
44. This is what it looks like now.
45. Apply Humid eyeshadow to the outer portion of the lower lash line.
46. This is what it looks like now.
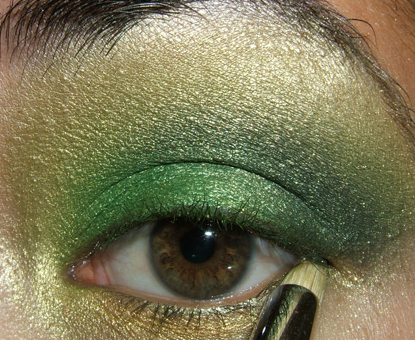
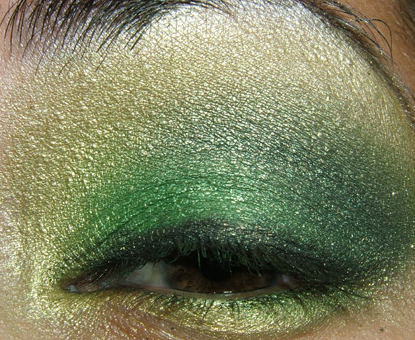
47. Darken the crease if you are so inclined (I did).
48. With the 208 brush, dab it into Blacktrack fluidline and apply a thin line across your upper lash line.
49. A tapping motion from inner to outer lash line helps to deposit the color easily. Patience is key!
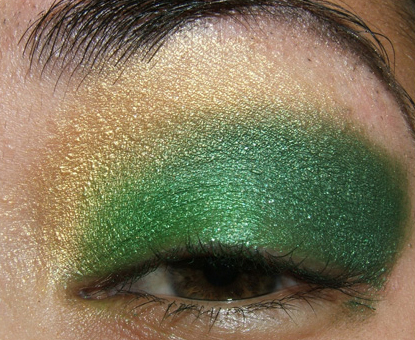
50. This is what it looks like now.
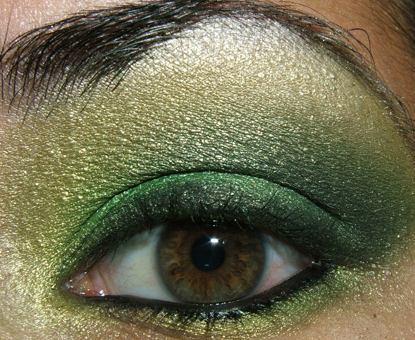
51. With your 219 brush, apply Femme Noir eyeshadow over Blacktrack fluidline.
52. This is what it looks like now.
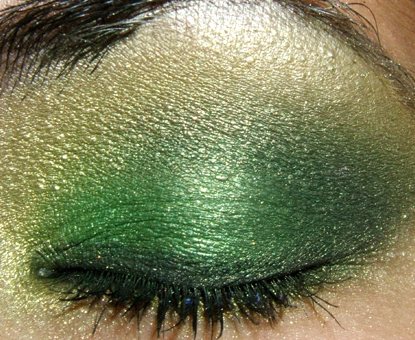
53. This is what it looks like now (open).
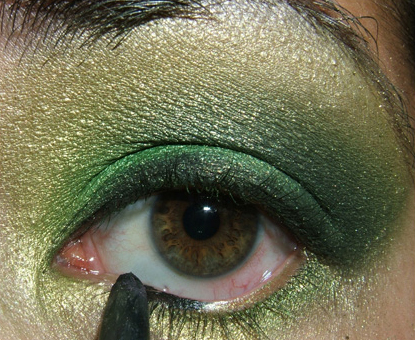
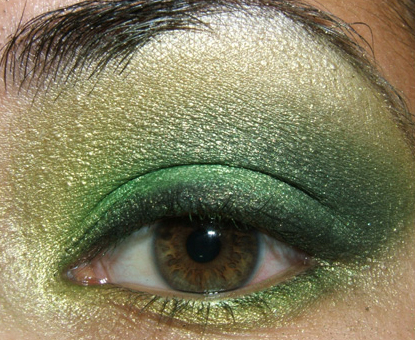
54. Dip your Graphblack technakhol into Blacktrack fluidline and apply to lower lash line.
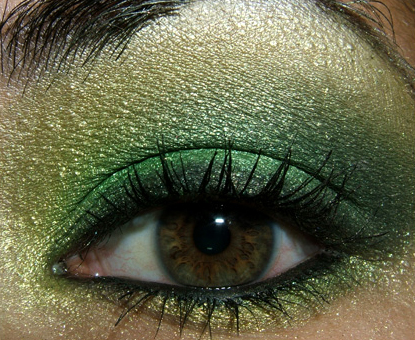
55. This is what it looks like now. Add black mascara and you’re finished.
YOUR TUTORIALS ARE SOO EASY TO DO I LOVE IT! MINE MIGHT NOT COME OUT THAT GOOD GOOD BUT ITS GETTING THERE LOL!
DO PIGMENTS HAVE A BETTER COLOR PAY OFF THAN EYESHADOWS? I FEEL LIKE WHEN IM AT THE STORE IT JUST LOOKS LIKE SOO MUCH PRODUCT IS IN THERE. SO IT MAKES ME WANNA BUY IT BUT I CANT BECAUSE I DONT KNOW HOW TO USE PIGMENTS!
Thanks, Tatiana! I do think pigments have more pay off than most eyeshadows!
LOL WHAT I MEANT TO SAY IS THAT, I FEEL LIKE IF I USE A PIGMENT IT WILL END UP EVERY WHERE ELSE THAN ON MY EYE LIDS. JUST LIKE MY EYESHADOW RICE PAPER THAT I BROKE AND HAD TO PUT IT IN LOOSE FORM. IM LOSING SOO MUCH PRODUCT EVERY TIME I DIP MY BRUSH IN IT, IT SUCKS!
If you use it using the mixing medium it won’t go everywhere!
Great tutorial! Your steps are very easy to follow with the pictures. I’ll be sure to try this one – it’s beautiful! Have you really gone through that much of the pigments?!
Thanks, Heather!
Nah, I’ve never gone through a whole jar before. I used to sample mine out!
thank you so much for doing a tutorial on this look, christine!! this is definetly one of my favorites & now im so happy i can finally replicate it! haha, you’re great..thanks again! 🙂
My pleasure, Ellie!
I love your hair!
Thanks, Vanessa!
This was a great tutorial! Thank you so much! It looks beautiful! 🙂
Thanks, it was my pleasure, L!
I love this look so much! I have dark green eyes, and I think this look would work well for that! Fantastic job!
Thanks, Brittany! I hope you wear this look sometime!
Lovely, I want to save all those pics and try this out for myself! Thanks Christine, you’re awesome with this!
Aww 😀 I hope you try it, let me know how it works out!
Thanks!
You look great in this look. I love that you have pics of the products!
Thanks, Kleri! I try to get a product pic if I’m doing a tutorial!
Thank you again!
Great that you added a picture of the products, I love that. Could you do another post of your collection since it must have changed since your last one. That would be so great, I´m nosy, I know 😉
No problem, Nell! I’m happy to help!
I’ll try – but I imagine I won’t be able to get around to it until summer.
This one was just gorgeous!!! And I really appreciated that you showed us the shadows you were using, it makes it a lot easier to copy the look =)
Thanks, Veronica! 🙂 I’ll try to make sure I always include the products in the tutorial.
at first it was tuff to ignore the stray hairs but i was soon distracted. LOL.
you used so much pdt on your lid to achieve the look. how long did it take you in all? i’m a working mom and have like all of 15 mins to do my whole face. i guess i’ll just have to stop short where you implied earlier with some quick lower lash line/ waterline action.
lastly, i too like that you showed the pdts that you used, in a group shot, at the beginning. i found that helpful, somewhat.
LOL, Natasha! I didn’t even realize they were there, I had thought I had gotten them all off.
The tutorial took awhile, but to do it without having to take photos for every step is about 15 minutes or less, honestly 🙂
I love this look. I have all except Emerald Green pigment, what could I use instead?
Hey Ashlee! Do you have any green base? Like Lucky Jade or Chartru paint? You could probably get away with just using UDPP and being sure to layer the shadows over it heavily.
I love this look! It’s so nice on you! And everytime you show a nice look I found out that I need to buy some more shadows, I always miss one or two colors in your looks 😉
Thanks for a very good tutorial!
Thanks, Helene! 🙂
lol, well, eventually you’ll find you own so much that you can dupe it!
Wow, I love this look! I’ve stopped by your site for quite a while now but this tutorial is so helpful that I just had to comment 🙂 I’m a total makeup virg (despite being a uni student) yet I always find your tutorials easy to follow. In fact, they always make me want to run out and spend a months worth of rent at a M.A.C. counter, haha.
Keep up the great work Christine!
Thanks, Jousy! Appreciate you commenting 🙂
I didn’t get into makeup until my first year at college, so you’re not the only one who’s been a late bloomer.
Love this look! Great tutorial, thanks
Thanks, Gio!
No prob 😀
Just beautiful! Thanks so much for posting pictures of the products – great idea!
Thanks, Katherine! My pleasure!
I was hoping you’ll post tutorial for this look, it’s really beautiful one and eventhough my eyes are green and I shouldn’t wear greens I’ll try it! And I’m amazed by how much pigments you used, I got so far only 5 and I feel like I will be using them for the rest of my life, still the same jars and then my daughter and I wouldn’t be surprised if granddaughter to! lol
Hey Camilla! Psh, I say wear greens, who cares 😀
Oh, I haven’t used all of that, LOL. I sampled out my jars awhile ago, and this is just what I kept for personal usage!
Awesome tutorial!!! I really really love this look 🙂 Thanks for taking the time to do this!
Thanks, T! My pleasure!
I think that its great you included a photo of the products you used – that makes it easier to replicate if we don’t have the same exact products you used. Fortunately for me, I have all the products you used in this one (rare), so I will definitely be giving it a go one of these weekends. I have a cute gold top that I think would look awesome with this eye combo! Also, I love that you showed how you went back a few times to increase the vibrancy and/or darken the crease. I think that a lot of people actually DO this, but don’t show it in their tutorials & then when you try it, its not as vibrant/dark/bold as the original. Great job!
Thanks, Ariele! 🙂
That’s so great to hear you have all the products, especially since I used a whole lotta products, lol!
Whooo that’s a lot! Gorgeous tho.
Tell me about it, LOL!
Thanks, Dee!
Fantastic tutorial, Christine! You look so pretty 🙂
Thanks, Diana! 😀
I swear girl, you always make me lem for pigments, lol! But I love this look and the greens work fantastic with Goldmine! And it brings out your eyes beautifully. Gorgeous as always my dear 🙂 Hope you’re having a great day so far!
I adore thee pigments 🙂 Do you have any? If not, you need them STAT!
Hope your Friday’s fun!
Oh Christine! so beautiful.. 🙂 you are so pretty!
Aww, thanks so much Crystal! 😀
WOW! That would be a bit too dramatic for me. But, you…you…you made it work!=)
I love the lip combo, btw!<3
lol, it is a bit dramatic, but it’s not TOO wild.
Thank you!
i love this makeup beautyfuul
Thanks so much, Alba! 🙂 Happy to hear it!
This is too gorgeous! I really love greens!
Thanks so much, Erin!
Green is your color Girl!
Loves it!
Thanks, Monique!
Your hair looks great at this length. Love this look on you! Do you think it would be too much on really fair skin? I also have blue eyes/blonde hair and lots of pink in my complexion. Not sure if these greens would suit. Any recommendations?
Thanks so much, Jennifer!
No, I don’t think so. I mean, I’ve seen fair skinned ladies rock really, really OTT looks and look good doing it! Never hurts to try 🙂
Perfect for a wild night! Looks like a makeup professional! I love green, is my favorite color.
Thanks so much, Maribel 😀
I see you use a mixing medium for your pigments. I was going to call up mac and order one, but I noticed there are several kinds. Have you done any reviews on what each one would be best used for?
Thanks 🙂
P.S. I love your looks. I’ll have to try some when school ends and I have time to practice.
I use the water-based mixing medium. I think the two primary ones are water based and gel based. The gel based is better for liner or mascara than applying pigments to the lid!
absolutely amazing look!!! u look fab!!! i luv it!
i was wondering what could i use instead of wondergrass e/s?! thanks!!!
Thanks so much, Liz! You can try Swimming if you don’t have access to a PRO store, otherwise Bio-Green is pretty good!
I have a random question I noticed in a picture above. You have a square eyeshadow placed into your mac pallet…. is that a NYX shadow if yes does it fit right in the circle or do you have to alter it somehow? I am trying to figure out where to put all my square shadows and need advise…thank you and god bless!
Hey D! No, it’s a MAC shadow from one of their holiday palettes. 🙂
My absolute favorite look! Your site is amazingly helpful, love it! =]
Thanks, Jujii!!
Christine..
I pretty much know how to apply basic makeup, btu I love your work and I’m DETERMINED to try it, but before I begin… can I know exactly what glycerin (liquid) you use.
I’ve gone to walgreens/CVS.. etc and I cant seem to find it since I really dont know what it is..
HELP! 🙁
I found mine in the first aid aisle! You could ask, though. I got mine from CVS I believe, actually!
Glycerin is sort of like an adhesive.
Perfect.. I’ll try right after work. Also, how do you mix it exactly.
I appoligize for the so many questions, but tomorrow I will be doing the makeup for some of my sister’s friends for prom, and I want them to look EXTRA FAB! hee hee
Just shake it up to mix 🙂
LOL.. I meant like how much water how much glycerin more or less.
SORRYY
1 tsp glycerin, 3 tsp water 🙂
PERRRRRRRRRRfect.. thanks soo much for your help
No problem!
i am a beginner, and i find it very difficult to apply eyeshadows. it looks horrible. i tried ur matte smokey eyes look, just colud not get that v-shape. and i am soooo in luv wid that look, i want it. my eyes r hooded and i kind of have a deep crease is that the reason. how do i create the winged eyeshadow look or the v-shape at the outer corner. i end up getting a rounded end which does not suit me at all.please help!!!!!!!. i don’t extend the eyeshadow beyond the lashline could that be the reason.
Hi Asma! I would say to just keep practicing… it will take some effort and practice before you’ll figure out how to get that sharper v-shape that you want. You may want to go past the lash line, just a bit!
Hey Christine, I recently came across your eyeshadow tutorials and found this webpage with many more of your tutorials, first of all I would like to add that you do an absolute AWESOME job, with BEAUTIFUL results. I wanted to know if maybe you could maybe HELP ME (Please!!). Where can I get a hold of all the pigments that you use—supplies needed, I’ve been searching but have NO CLUE how to get started, the first tutorial that I came across was the rainbow effect-i absolutely loved it and I have to try it, but I dont know how to get started-where can I get my supplies!!! Hope to hear from you soon!! Thank you, and again you have MAD SKILLS—share the wealth:) PLEASE!!!
Hi Jessica!
I get all of my pigments from MAC! Some of my later looks offer substitutions for anything that was LE or discontinued!
i loooove this look…trying it in 5..4..3..2..NOW!!
Nani =0)
Thanks, Nani! Hope it turned out well for you!
O hi Christine.how are you.i love this look and this is your best look i belive.Christine! thank you soooooo much to tought us like a very good teacher.I’m very exited and happy to see this tutorial
Thanks, Sidra 😀
gorgeous!!
i have a question though, what does dipping the liner into the fluidline do?
thanks!
Thanks, Evelyn!
It lets you apply the fluidline, but you use the point of your pencil for the applicator.