Tutorial - Barbie Loves MAC (Green Look)
This is a tutorial detailing how to do one of the Barbie Loes MAC face charts/looks from the MAC promotions. It uses green and pink for the most part.
Skill Level: Moderate
I used Golder’s Green pigment on lid, Fuchsia pigment above lid, Metamorph eyeshadow on lid, Guacamole eyeshadow on outer lid, Humid eyeshadow on outer lid, Pink Papillon eyeshadow above crease, Nocturnelle eyeshadow in crease, Sketch eyeshadow in crease, Soft Heart eyeshadow on brow, Metamorph eyeshadow on lower lash line, and Graphblack technakohl on lower lash line. I had Dollymix and Plum Foolery blushes as well as Glissade mineralize skinfinish on cheeks with Enriched Refined Bronze to contour and Pink Opal pigment to highlight. I wore Fashionably Fuchsia lipstick with Crystal Rose lipglass and Already Fab! chromeglass on my lips.


Supplies: Golder’s Green pigment, Fuchsia pigment, MAC’s water-based mixing medium, Pink Papillon eyeshadow, Metamorph eyeshadow, Guacamole eyeshadow, Humid eyeshadow, Nocturnelle eyeshadow, Sketch eyeshadow, black liner, black mascara, Enriched Refined Bronze, Dollymix blush, Plum Foolery blush, Glissade mineralize skinfinish, Pink Opal pigment, Fashionably Fuchsia lipstick, Crystal Rose lipglass, and Already Fab! chromeglass.

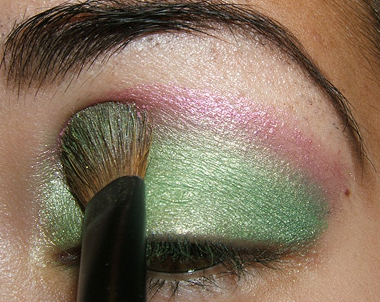
Dampen (not wet!) your brush and pick up Golder’s Green pigment and apply it all over your lid.

Like so.

Picking up more Golder’s Green pigment, apply the pigment to your outer crease.

Bring the brush in a fluid motion further towards your inner lid by brushing upwards and inwards. You want to cover your entire lid as well as your crease with Golder’s Green pigment. You can do this by starting at your inner lid and brushing upwards and outwards, the reverse of the previous step.

Like so.

Using the same method as before, only this time with Fuchsia pigment, pick up a small amount of the pigment and gingerly apply it above the Golder’s Green applied earlier. We only want a very thin line of pink, so take your time.

You do not need to have a precise line, but something like this will do.

Using your eyeshadow brush, pick up a generous amount of Metamorph eyeshadow and cover the entire portion of Golder’s Green pigment on your lid.

Make sweeping motions to help apply, blend, and set with the pigment underneath.

Like so.

Like so x2.

Pick up Guacamole eyeshadow and apply to the outer portion of your lid as pictured.

Add a touch of Humid eyeshadow onto your brush and apply to the very outer edge of the green portion of your lid for more dimension (hard to see here).

Like so.
Picking up some Pink Papillon eyeshadow with your brush, apply over the Fuchsia pigment in the same way you applied the pigment originally, and follow the same “line.”

It is best to start on the inside and move towards the outside by making a fluid, sweeping motion that drags the eyeshadow further out.

Like so.

Pick up a bit of Nocturnelle eyeshadow with your eyeshadow brush and apply to crease. Start slightly further inside and move towards the outside.

Hold your brush so that it is horizontal (a small edge, almost like it fits inside your crease) and drag-pull it downwards and outwards.

Make several sweeping returns over the same area and in the same motions to blend the crease color with the rest of the colors.

Like so.

Apply Soft Heart eyeshadow to brow, starting just under the arch and move outwards and downwards, following the line of your brow. Pick up more Soft Heart eyeshadow and apply it underneath the innermost portion of your brow.

Pull Soft Heart eyeshadow to blend with the other colors by picking up more of the color as needed and going slightly over the highest dissimilar color and dragging it upwards to blend out the darker pink color.

Like so.

Now, the look is essentially done, but fix any mistakes or oversights at this point. I darkened the crease with Sketch eyeshadow following the same method as earlier. I also put on a little more Metamorph eyeshadow on the lid.

Like so.

Like so x2.

I’m using a small crease brush to apply Metamorph eyeshadow on my lower lash line. I start on the outer portion and move inwards until I have a thin, solid line.

Like so. Add your choice in black liner and black mascara.
Finished product…


Tutorial was very helpful, as I bought the Barbie mac line, but had no picture except my memory. Thank-you so much for the help. It is greatly appreciated and well done. Nancy
I’m happy to have helped you, Nancy! 🙂
Oh, wow! That’s so pretty!
Too bad I can’t see your full face! But, I know it was hot on you!
Hey Sash!
Thanks so much!
I’m sure I have a full face photo somewhere, lol. It may be in the original look post for it.
That was great, I really needed this tutorial, i was searching all over the web for this, I am going to my bday party and its a 80’s theme, and i wantd to do this look for my face.
Thanks, Diana! I hope this works out for you!