Tutorial - Dewy, Glowy Flawless Skin; Foundation, Blush, Contour, Highlighting
This tutorial will walk you through, step-by-step, on how to apply liquid foundation, powder, contour, blush, and highlighting for a semi-dewy face. You may want to peruse my red lips tutorial, as well as brow tutorial. Also, I have done a few face tutorials in the past (you can never have too many, right?): glowy cheeks, and my original face tutorial.
Do let me know what you think, and if this was helpful! (Now, back to studying!) And if you have a TeamSugar account, make sure to show us some love!
You will need:
- Products: Liquid foundation, concealer, blush of choice, contour color of choice, highlight color of choice
- Tools: concealer brush (194), buffer brush (182), stippling brush (187), angled contour brush (168), blush brush (150)
- I used: MAC Face & Body (NC30), Make Up Forever Lift undereye concealer, Afterdusk blush, Sculpt sculping powder, Tenderdusk beauty powder
Now, it is time to build the full-face with all the trimmings…

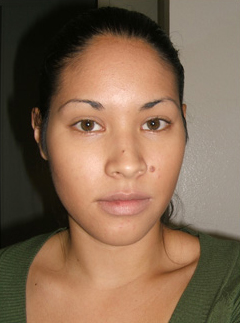
Step 1: Start with a freshly cleaned and moisturized face–free of makeup.

Step 2: Using the 194 brush (small, firm concealer brush), apply dabs of liquid foundation onto cheeks, chin, and forehead (nose, too, if you wish!).

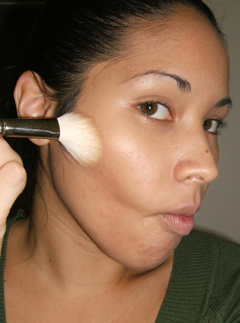
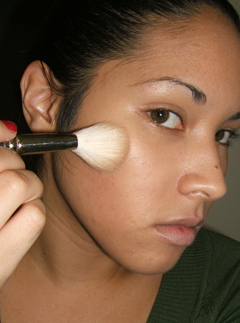
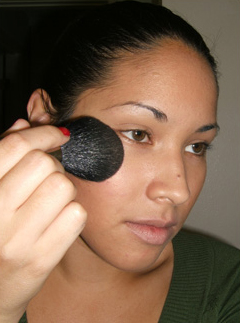
Step 3: With your buffer brush, pull each dab of foundation out to provide even coverage of the area (e.g., chin as shown).

Step 4: Continue to pull the foundation dabs to cover your skin (e.g., cheeks as shown).

Step 5: You can use sweeping or circular motions, depending on your preference. I usually sweep the dabs out across the skin and then use circular motions to even it out.

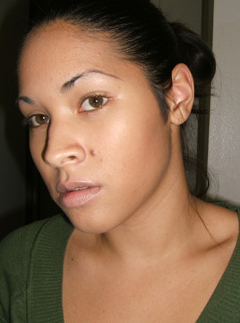
Step 6: This is what a naturally dewy liquid foundation looks like.

Step 7: Admittedly, most people apply concealer first, and I do it sometimes as well — I haven’t found it particularly meaningful for eyes (which is the only place I use it). If you use color-correcting concealers, then it is a must to apply prior to foundation! Nonetheless, same technique can apply… Apply undereye concealer underneath lower lash line covering the dark circles life has given you, and make sure you apply enough that it goes below the area you want to conceal.

Step 8: Introduce MAC’s 187 stippling brush–a cult favorite–is great for gently brushing concealer into skin.

Step 9: Sometimes I need to close my eye to really be able to sweep the concealer to perfection.

Step 10: Bye-bye dark circles, well, kind of.

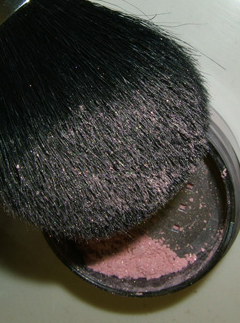
Step 11: Using the 187 stippling brush, apply a pressed powder like MAC’s Mystery Powder all over face to set the liquid foundation and help minimize shine.

Step 12: See, less shine already, yay!

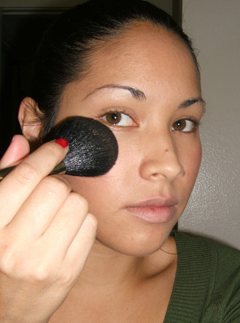
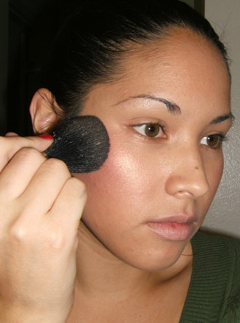
Step 13: Using the 168 angled contour brush, I picked up a token amount of Sculpt sculping powder and place it just below the apples of my cheeks.
Step 14: Suck it in, ladies. Finding the right place to contour is easiest by making the “fish face.” Where your cheeks hollow out, that’s where your brush should be going.
Step 15: Gently blend the contour out–not too much–but just enough so it fades out and isn’t a harsh line.
Step 16: It’s coming along, right?
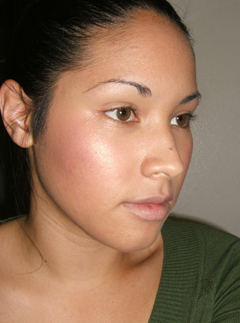
Step 17: It’s easier to see the effect of contouring from straight-on–too bad I’m a little off-center there! But you can tell on the left side (your left) that my cheek isn’t so pudgy.

Step 18: Using the 150 powder brush, pick up a little bit of Afterdusk blush.

Step 19: Smile pretty, because you want to see the apples of your cheeks, which is where the blush should be concentrated on (and blended outwards so you don’t have two circles on your face).

Step 20: Blend the blush color upwards towards your temple, but not so high as to extend past your eye area.

Step 21: Like so.
Step 22: If it’s not dark enough, go over it with another pass, utilizing the same technique.

Step 23: See, same technique!

Step 24: Back to our beloved 182 buffer brush, because we need to buff the blush color and contour color together.

Step 25: Don’t leave out any part!

Step 26: Now we have raspberry-ish cheeks.

Step 27: Subtle blush, I would say, perhaps a touch darker than subtle…
Step 28: Again, with the 150 powder brush, pick up a bit of Tenderdusk beauty powder (our highlighter).
Step 29: Apply on the top of the apples of your cheeks–essentially, we are trying to highlight the cheekbones, so if you need to, feel around your cheeks for good measure.
Step 30: Move upwards towards your temple.
Step 31: Pretty!

Step 32: Hey, if you want to utilize your highlighter, feel free to dab a touch of it on your forehead.

Step 33: Chin, too — reflecting light off your chin can accentuate features. If you really want to go all out, dust a touch along the center of your nose (best to do this last, so you use remnants of highlighter rather than a full swipe of it, so you don’t overdo it).

Step 34: Cheeky, aren’t you!

Step 35: Always fun to see it from the side-view.
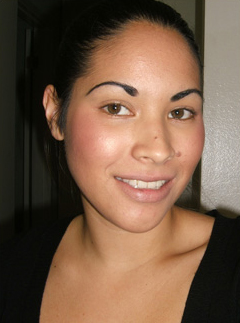
Step 36: Add eyebrows (thank god for brow filling!), change shirt (love green shirts, but not with this blush!), and you look instantly more put together.

Step 37: Yes, I do believe we’ve done our skin a favor.
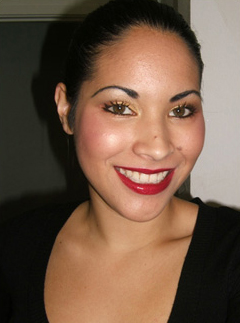
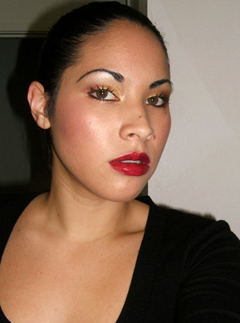
Step 38: Add eyeshadows and lip color for a true view of how it all comes together.
Step 39: One more view from the side, just to show off the cheeks better. Voila!
Lovely! 🙂 (you don’t even need make up!!!)
Thanks, Stacey! 🙂 I look so young without my brows filled in, so I gotta have a little somethin’ somethin’!
Wow – you look amazing. Great lipstick too!
Thanks Tonee!! 🙂 I love Red Romp!
You look gorgeous Christine, thanks for the tutorial, I agree you don’t even need makeup im jealous! The bold red lips looks darling on you!
Thanks, Vanessa! 🙂 It’s my pleasure to share it with you!
wow you look so beautiful without makeup to :))
Thanks so much, Raquel!
wow, you look great even without makeup. i look sick without makeup. without makeup, you look like your younger sister whose not allowed to wear makeup yet. and with makeup, you’re the sophisticated sister. if that makes any sense.
Thank you, Victoria! I know what you mean – I think I look a lot younger without makeup.
Great tutorial, Christine! I never thought to use a kabuki brush to blend liquid foundation, what a great idea. If I use liquid, I usually blend with the 187, and then buff a powder over it with a kabuki. I’ll have to try your method.
Do you always wear Face & Body? I haven’t tried it, but it really does look flawless on you. You have wonderful skin already though 🙂
Thanks!
Thanks Ariele! I’m glad you enjoyed it. I used to use the 187, but I’m a long-time convert over to the 182.
Nope, I just started wearing Face & Body, actually. My normal foundation is Studio Fix Fluid. I’m alternating between the two right now!
*boggles at the transformation*
Oh yes, a very useful tutorial! How to use that thing called “blush” always baffled me. And I am ever so envyous of your skin. Mine has suffered through more than a decade of persistant acne and is only just starting to recover. Poor skin! But MAC does amazing things so I’ll have to try this method. I find that my trusty 190 brush isn’t needed as much these days.
Thanks, Tekoa! Blush is always a funny thing. I NEVER use the 190, so streaky!
Gorgeous! I just stare, really I do!
But I thought the blush looked great with both shirts, including the green.
Thank you so much Stella 🙂
Beautiful! I think cheeks are the hardest for me, but I just keep at it and this should help, thanks for another great one!
Thanks Joy! They’re tough for me too 🙂 I struggle with them sometimes!
lovely as always 🙂 god i wish i could contour my cheeks like that! mine always looks like a 4 year old did it……….
Thank you Courtney! Oh, keep trying, you’ll get the hang of it with practice!
I love this one.. iam always on the quest for flawless, glowing skin i think its a must! I just bought MAC Hyper real foundation and love it.. it last all day and leaves a great canvas to play with have you tried it Christine?
Thanks, Crystal! I haven’t tried HyperReal yet!
That is beautiful! such a natural glowing look, I luv it! Quick Q: what do you have on you lips in step 10?
Thank you, Kay! I’m not wearing anything on my lips!
Love the tutorial Christine. You are a gorgeous natural.
Thank you Mrs. Lynne! 🙂
Gosh ur gorgeous woman
Thank you!
OMG,I love you for this! LOL
Stunning results. Please make more of these tutorials in the future. I learn so much from you
This demo is the best I’ve ever seen
Thanks Arina! I’ll try my best!
Yup you really look gorgeous even without make-up! And I’m surprised at how little liquid foundation you put on your face! I’m gonna try using the 182 brush for foundation later and I hope I get the same nice results as you.
Thank you, Janis, for the sweet compliment! 🙂 I honestly find that it’s best to go little and build up as you need it. Sometimes I have a good skin week, and then other times I have horrendous days and I’ll go back over certain spots on a second pass.
Let me know how the 182 method works for you!
Wow the 182 on foundation is amazing!! It smooths on foundation without the nasty bristle marks I get from the 190. And I also tried the 187 for concealer and wow! It smooths it on well too. Now I’ll try the 187 on foundation and compare it with the 182 🙂 Thanks for the tips again!
Yay! I’m glad it worked for you! I used to use the 187, but then I bought the 182 and never looked back 🙂 Let me know what you end up using!
Besides the Foundation is everything else you used Make Up Forever?
Also, is the concealer worth buying?, or is there a better one? I’m looking for a good one because I have dark circles but I dont want it to be too heavy where lines will show. I bought the NYX one and I’m pretty pleased with it, though I’ve only used it twice.
xoxo
thanks!
Hey Sara!
Everything I use is MAC unless I state otherwise, lol! So just the undereye concealer was by MUFE. IMO, I’m not that impressed with the concealer. I haven’t found one that I LOVE quite yet.
Okay the afterdusk and tenderdusk I know are MAC now…but Make up forever has sculpting powder so which did you use for that?
Do you use face primers or eye primers?
I’m going to go on a major makeup/beauty spree SOON and I’m wanting to get the best of the best!
:]
The Sculpt sculpting powder is actually by MAC! It’s part of the PRO line, BUT good news is that there is a Sculpt/Shape collection coming out December 26th that will have sculpt/shape duos (so sculpt will be on one side, and I forget the matching highlight color is).
The only non-MAC product was the MUFE lift concealer.
I don’t use face or eye primers personally!
This is a very comprehensive Tutorial. Will bookmark this one…thanks 😀
Thanks Cristina! Hope it helps you!
Hey again beautifullll!* Do you just use concealer to keep your eyeshadows on then?
P.s. I wrote you an e-mail but I dont know if you have recieved it yet? I attached a couple pics as well. Let me know whenever you have time, I know you STAY busy!
Hey Sara!
I use pigments + mixing medium for a base usually. I have been using Pure Ore (Metal-X cream shadow) lately, though, since I’ve done a few looks with it!
I got your email and will respond soon, I hope 🙂 Busy busy studying bee I am right now!
I tried the foundation with a big buffer type brush, spayed it down with some face mister stuff and did little circles 🙂 it really does look super nice, I think I will start doing my foundation like this from now on! Thanks for the tut it has proved to be most helpful.
I’m so happy to hear it worked out for you! I love it when things turn out well 🙂
i love this demo!!!! by the way, what red are you wearing on your lips? it’s beautiful!
No problem! The Scene lipstick and Red Romp lipglass 🙂
Hi Christine,
After reading lots of review, i finally caved it and bought the 187 yesterday. After washing it, I applied liquid foundation and was so dissapointed to find those bristles on my face. I normally wear studio tech but I have a liquid foundation lying around and thought i’d give the 187 a try. Now, I am considering the 182 after seeing this tutorial. But i do like the 187 on how you use that for concealer. What do you think christine…should i exchange that for 182 or should i keep 187 and get the 182 too. I only wear transluscent loose powder to set my makeup, sometimes liquid, and normally studio tech which i have a non-mac brush like the 190
thanks
Hi D!
I would go with the 182 over the 187 if you had to choose, but if you apply highlighters, dark blushes, or mineralize skinfinishes, the 187 is great for those!
Wow, what a great tutorial!
You are beautiful without the make up–not too young at all! I still look about 17 after putting makeup on, lol. I am sooo envious of your skin! It’s such a hassle for me to put on a full face of makeup because I have so many acne scars/blemishes to cover up.
Thanks, May 😀 I look SO young, in my eyes, without makeup, lol!
Thanks. This tutorial is great! I never wear foundation because I am scared of putting too much on. However, this tutorial has made me want to try putting on foundation, it doesn’t seem so scary anymore.
Thanks, Melissa! Just start small and add as you go, that way you won’t put too much on 🙂
Great tutorial.
Honestly, i think you have beautiful skin with out the make up. Ur skin without make up is nearly flawless (at least from what I see. I am def gonna try this out. I ve been looking every where for a tutorial for dewy skin.
Thanks a lot.
PS: is that ur natural eyecolor? it’s gorgeous!
Hey Jean!
Thank you so much! I hope you find the tutorial helpful 🙂
Yes, it’s my natural eye color!
you look beautiful without the makeup. your skin looks amazing. but then again, i’m a fan of the natural look.
cheers
Thanks Kochou 🙂 I appreciate the compliment!
Great tutorial. Awesome end results. Very pretty
a few questions:
Do you use a primer under your foundation? I don’t and I find I break out when I use foundations and especially concealer.
Do you think you get a better, smoother finish with liquid foundation or with powder? I can see you like Liquid but do you feel that powder is pointless? Powder doesn’t break me out but I don’t get good coverage.
Hi Dawn!
I don’t use primer for my foundation – I recently bought Smashbox’s, but I’ve yet to use it.
I prefer liquid, because I feel you get better coveage, finish, everything. It just goes on smoothly, and I find it lasts longer, too. Powder never worked for me. I did like Sephora’s powder compact over Studio Fix (which broke me out).
amazinngggg stufff!!! i never thought make up would be that easyyy..love the illustrations…this would cost a fortune at the parlour…thanx a lot..the only problem i see is the equipment that you are using…we dont get it here!!
Thanks, Diva! Aw, I hope you can find equivalent equipment!
How about some constructive criticism? Well, here it goes.
I really think you look way prettier in the first picture (without any makeup). Well, actually, everything looks good up until Step 35 and then it’s all downhill from there. And in the final picture you look much older.
DISCLAIMER: I am a guy, I came here by accident, I don’t know the first thing about makeup.
Hi!
Well, thank you very much! Is it the lips? That’s the biggest difference from Step 35 and before (and eyebrows, I suppose). My boyfriend actually doesn’t like red lips either!
Christine,
Thanks for responding. I am with your boyfriend on the lips: I think the color is a bit too much. Some might find it appealing, though. But by far the biggest difference between 35 and 36 is the eyebrows: they go from pretty to pretty crazy.
But if you like it this way, I have a suggestion – may be instead of donning a black top (which I feel is sending a bit of a mixed message in this case), you should go all out and adopt an Andalusian look. Why not try a brightly colored dress – e.g. a red one matching your lipstick color?
Thanks for the tip! I find that the filled in brows can look really dramatic, but I think when it all comes together, they’re not so much that way.
There are definitely women who opt for the bright red top with a red lip, but I’ve found it’s almost overwhelming, you know? Too much red almost! I appreciate the suggest and will try it next time, though.
Hey Christine,
Loved this tutorial, and I agree with everyone else, you are so beautiful you don’t need makeup! 🙂
I was wondering what blushes you would recommend for my skintone? I’m an NC25 in the MAC Studio Tech.
I really some blushes that I could use each one for a daytime look, and one for night look with dark smokey eyes? Any ideas?
Thanks again Christine! YOU ROCK!
Hey Sara!
THank you so much!
I’m NC30, for reference, so I’m not much darker than you (and honestly I think right now I’m probably NC28, if they made it, lol).
I really love Margin and Springsheen. Those are two fab blushes that’ll go great with your skintone, and neither are too bold or bright. Dollymix is a nice brighter blush, but I wouldn’t pair it with a smoky eye, especially a dark one. I’d probably opt for Springsheen, just a light dusting, for that.
Thanks so much, Christine! I’m off to my nearest MAC Counter now. Yay! 🙂
What are your thoughts on Studio Mist? I own it in Medium Dark and simply apply it with the 187 and I love it, but I had my friend try it and she didn’t feel it evened her face out enough or something.. just wondering how you felt about a mist foundation.
To be honest, Jes, I haven’t tried it. Did she use it the same way you did? Perhaps the coverage isn’t heavy enough for her.
Christine ur just so pretty! With or without make-up!
AWESOME!
Thank you Sash!
Hii! this is the first time ive left a comment on here, im from england and have been visiting this website for quite a few months now, and i must say i absolutely lovee itt!! everything you do is awesome & so useful. Im pretty awful at applying make up so the tutorials are great! I was introduced to mac about a year ago and love it & im so addicted to it so its good to see reviews about all the latest products. Anyway i was wondering if you could suggest some colours that would suit a dark skin tone as i often have difficulties finding shadows, lipsticks etc that suit me. i am asian and have mid brown skin, the foundation i used is nc45 and nc40 concealer. But im new to the whole make up thing (as im only 17) so im useless at creating looks. By the way this tutioral for flawless skin is fab! thanks! keep doing what u do, its great!
Hi S.C.! Thanks for stopping by! I’m really glad you’re enjoying the site! Honestly, you just need a good base and you can use any eyeshadow you want!
Try some coral and pink lipsticks, I think they would look great on you!
Love the look, and your skin absolutely glows!
Thanks so much, Faiza!
i love it.what kind of shimmer did y use
Tenderdusk beauty powder!
Like how you color your cheeks, so skilful! got to try this myself! I love the 187 brush too. It is so versatile.
Thanks, Sophia 😀 Yay for the 187!
i never put foundation on my face but sometimes i guess its good too b/c your skin comes out more even in pictures…however when i do put on foundation my skin becomes really dry what should i do?
Hey Sarah!
You should moisturize before you put on foundation, that should definitely help, and stay away from foundations that are matte!
Hey Christine pls i did not know where else to send u an email but i hope dis does.i have 2 questions.
1.what hghlighter would be best for my skin color.
2.i sent u an email via ur gmail.cld u pls chk it out.i need u to help me dissect a picture of eva’s makeup.thanks a lot.
Hey Ash! I replied to your email 🙂
Really… any highlighter will work for you!
love how you apply little amts of makeup to create perfect skin!
Thanks Lisa 🙂 Glad you liked it!
You look beautiful with the makeup, but you look gorgeous before you put the makeup on, au natural suits you!
Thank you so much, Amy 🙂 I feel like I look very young without any makeup!
whats the difference between a pressed powder blush and a loose powder blush? is the loose powder kind better?
A powder blush is more pigmented and it’s just… pressed. It is less likely to get “all over the place,” like a loose powder would. It just depends on your preferences. I have several MAC loose beauty powders, and they’re great for highlighting (face/body). I stick with powder blushes for cheek color, though.
It is me Rachel agian.Thanks for your help.I can only buy mac online and i really use your help.What do you prefer from lustre glass cultured or dreamy for a nude pink colour.And may I use a white or pink eyeshadow as a illuminaor above the cheeks and on chin and forhead.
Thanks again
Rachel
Dreamy is better for a nude pink, Cultured is a bit purpleish compared to Dreamy. You can use either white or pink, depending on your skin tone and how intense they are. I tend to use white-gold/beige/peach for warmer looks, pink-white for pink looks, and white for cooler looks.
This is an AMAZING tutorial. What brand is that blush – “afterdusk”? Is it a MAC LE?
Thanks, Victoria! It was MAC LE, you might try True Romantic beauty blush powder (LE too, but just came out).
I love ur makeup tip’s,I’m just getting started as a makeup artist and u gave me a big jump in life.I go to beauty school and in school they teach u only a little bit about makeup,so like i said ur tip’s were very helpful please give more tip’s in the future or email any helpful info
Stylezzz
Thanks, NYC! I’m so happy to be able to help. Just keep checking the blog for more tips!
I love your natural look and your creativity!
You’re so pretty- you definitely don’t NEED makeup!
Aww, thank you so much, Lauryn! I feel so odd with NO makeup sometimes – very young…
U have amazing skills! Thnx so much!
Aww, thank you, Ayat!!
I was wondering what your thoughts were on mineral make-up like bare minerals for foundation and coverage?
Hi Cocoa,
I think that mineral makeup can be good for those who want light to medium coverage. I haven’t found any mineral makeup that gives me heavy coverage.
Beautiful! You are naturally gorgeous but you look great with makeup too!
Aww, thanks so much, Cassie!! 🙂
Beautiful, gorgeous, perfect skin!
Do you think this foundation suits someone with very oily skin? I have used Studio Fix compact but I feel it goes a little bit “heavy” on me. I have some acne scars and need some coverage, but I’d go for a more natural look, yet I’m afraid Face and Body will not last and “cake”… any opinion?
Hey Lily!
Thank you so much! You may want to try Studio Fix FLUID rather than compact. SFF is matte finish, so it’s better for oily skin. Face & Body does have a bit of sheen to it, so if you look oily, you may find it only accentuates your oiliness!
You are seriously one of the best make up tutorial site I’ve seen yet. You’re so naturally beautiful, an you have such skill in the make up department! I’m learned A LOT today, and I can finally use it and help kill the sterotype that teens are terrible make up artists, because with your help I’ll be all BAMSHIZZLE.
Also, another thing, you wear a lot of make up, yet your skin is flawless?
What do you use as a makeup remover that isn’t harsh?
[If it’s stated before, sorry! It’s really late, and I’m tired!]
Oh, wow, thank you so very much, Julia 🙂
I use Lancome Bi-Facil for my eye or lip makeup if it’s heavy or I wear anything waterproof. I use a facial cleanser (my favorite is Renee Rouleau AHA/BHA Cleanser) afterwards. Sometimes I’ll use a makeup remover wipe at the end, or use a cotton pad with toner on it (which further removes any bits of makeup left).
You do a lot of makeups, but your skin is still flawless, wow!
Thank you so much, Kayra!
how do u compare synthetic and animal hair brushes for liquid foundation?
If you get good synthetic brushes, I don’t feel or see a difference, personally.
You look gorgeous with or without make-up…you’re so lucky you can pull off the natural look. You can go both ways; glamorous with, fresh and pretty without!
Thank you so very much!
Christine,
I have a problem! and wanted to see what you would recommend me. I have dark circles under my eyes. I wash my face every night and morning; however, they still show! The dark color under my eyes can be concealed pretty well, but the skin still looks unlabeled (not smoothed out). Do you know of a product or treatment I can do to smooth out my under eye skin? Thank you!!
Hmm! Is it just looking maybe, crepey? You could try an under eye primer, which would help smooth it over. It works much like a face primer!
I’ll do that!! Thanks!!
thanks. i learned new things now. Thanks.
My pleasure, Zee!
I love it!! The glow works best with skin that is smooth textured. If you treat the blemishes first, it will look even better.
Thanks for the tip, Gina!
your welcome!! Thanks for the tutorial 🙂 Beautiful glow!
Late to the party, but the link popped up at the top of the site. Great tutorial, thanks! It looks like you have a mole on your lip, just like I do.
So glad you enjoyed it, Caroline 🙂
Yep! Power to us!
Oooohhh so pretty! I wish you were my makeup artist! I just can’t keep up with all those brushes arrggghhhh!!!
Thanks, Pinkie 🙂 Aww!
hi! I love your tutorials you are so good! but my problem is that i wear too much makeup..for example this look is my normal going out look minus the lipstick. What steps of these would you leave out-eyeshadow, contour? I have a long face and big eyes if it matters
Hi Noora! You could leave out the contour 🙂 That can be heavier.
Stunning! You look like a model =)
Thank you so much 😉 You’re too nice!
You are so pretty that you don’t even need any makeup, and with it you are absolutely GORGEOUS!!!!!!
Thanks, for the great tutorial!!!
Aww, thank you Liz! You’re so sweet to think so!
Thank you!!!
No problem, Fergusina!
I really can’t thank you enough for this! I’ve always wanted to know how to get that sculpted, glowy look. I’ve seen about a million tutorials, but none are as good as yours! You are Queen of the Tutorials 😀 Thank you so much! x
Thanks, Alice! Glad you liked 😀
You are soooo ridiculously beautiful! You dont even need the makeup!!! Seriously! Great tutorial, thank you!
Thanks, Dina Adam!
A must have tutorial for me, I’m bookmarking this page! Thank you!
Thanks, Rachael!
No offense, but i would stop at step 34. You eyebrows look unnatural and gross filled in. If you are going to, try a lighter shade and blend it so its not so weird looking. And the lipstick is way too red.
Thanks for your input, Kimmy!
Hi!
First off, you have great skin!
I think your application of blush and your use of a highlighting powder is very good. However, I would have to say I prefer your look at step 35 rather than your final look. You should try a lighter, more natural shade to fill in your brows. Try MAC’s eyeshadow in Brun, Concrete, or Expresso. They’re great colors. Laura Mercier brow pencils are good as well. I think your look would be great for a dramatic, evening look. But as for daily makeup, eyeliner, eyeshadow, and nude lips look great on you!
This look is definitely a dramatic look, it’s not neessarily worn everyday. I currently alternate between Espresso and Brun, actually!
I find going particularly dark on brows is making a statement–it’s not to everyone’s taste, but I like it for some occasions. My brows are totally different now, though.
you are absolutely stunning, with or without makeup. i especially love what you did with your eyes – what did you use?
Thanks! I think it was just Ricepaper here.
I really appreciate this tutorial. I am quite good with the eyes and lips and help friends out but I am NOT good with cheeks or foundation. I only use a bit of concealer here and there b/c I can never feel confident I’ve “sculpted” correctly!!
Quick question if anyone can help…I’m an NW20, what would I want for sculpting powders? I don’t really like pinky or sparkly cheeks on myself…
You should try the MSF Natural line, Brenda! I think you’d like them to contour with 🙂
thanks Christine! i will definitely check them out:)
No prob, Brenda!
flawless skin!!! you are a cutie and i love your technique. i am going to look into doing my makeup like yours from now on
Thank you, Mayely!
love this look….love the blush…gotta have it
Thanks, Sadhna! Glad ya liked the blush 🙂
i liked till the blush dnt really like the shadow with the lipstick they dnt complement eachother……ehh its ok tho….but i really like the blush
Sorry you didn’t like it, Syd!
Gorgeous! Thanks for sharing – I sooo need to master the contouring part, I have pudgy cheeks! :p
No prob, Kimberley 🙂
I found this super helpful…I thought you had to wear tons of foundation to get that look. I’m excited to try your steps out. Thanks for taking the time to share this!
Good luck! I hope it works for you, Windy 🙂
Dude, you are SO gorgeous…with NO MAKEUP! Lucky girl! You do a great job on your application & the tutorial is FAB, but you are prettier without the red lipstick & dark brows…
(I was a makeup artist for many a NY Fashion Week show if that gives me any makeup-advice credentials 😉
AWESOME TUTORIAL PHOTOS BTW
Thank you so much, J!
Very well instructed.I am missing a few items used but good tips!You have nice skin so the make up looks really nice.I do aggre with Stacey that you don’t need it!
Thanks so much, Jo 🙂
Super pretty canvas! 🙂 But I liked it better before brow filling and shirt changing 😛
Aw!
Hi! I’m a new fan, and your tutorial is awesome – not like the 10 minute annoying ones on YouTube. Here, we can go at our own pace. Do you think that this dewy look would work for combination skin? I’m 14, and I can get dry cheeks and around the lip area easily but my nose is super oily (I know, gross). I’ve always wanted to do dewy ’cause matte is too unnatural looking for me.. What makeup (foundation, powder, blush, etc) brands do you recommend for combo acne prone skin? Thanks!!!
Thanks a lot, Hattie!
You could try MAC Face & Body, Make Up For Ever Face & Body, or even tinted moisturizer by Neutrogena or Kiehl’s.
Wow, I really needed this. Can you please explain what sculpting powder is, and some brands/products? I’ve never heard of that but anything that makes my cheecks look less puffy is a win lol. Also, for the blush- you said smile then apply to cheecks and move to temples- is that in circular motion? Then, how do you blend the counter & blush- in circular motion? And what is the highlighter? I mean, can you use the blush again or should it be something else?
Thanks!
Hey Ru,
It contours, so what it does it adds the illusion of a shadow, which causes your cheekbones to pop out more, giving you a slimming affect. You can use a small, circular motion once you’ve applied the color – this will help it blend out. A highlighter is a product that adds light/shimmer, which then reflects light. You would probably use something else – highlighters are often very, very light and pale.
Hey, I know this is an old post so hopefully you see this 🙂
I love this tutorial! I’m slowly venturing into the liquid foundation world and this kind of look is exactly what I was looking for. Unfortunately it looks like the few brushes I own aren’t really what works with your tutorial… have you seen any brush kits that come with at least a few of the ones you used? I just want something to get me started until I can slowly build a MAC brush collection. Also, any recommendations on a foundation for a tan mid-day oily face?
Thank you!
MUFE HD!
you look HOT!
I love your website….I love your makeup application, however the black pencil on your brows is harsh. You should consider allowing them to grow in a little and start penciling with a brown liner…..it will be a softer more beautiful look. Your beautiful btw.
Thanks for the suggestion, Vern!
Thanks for the tutorial…I luv it! You look very pretty! 🙂