Tutorial - Sunset Eyes
This is a tutorial for a look that makes it look like you have a sunset on your eyes using golds, corals, and reds.
Skill Level: Beginner-Moderate

You will need the following products: water-based mixing medium, a peachy melon colored base (Melon pigment), a soft yellow eyeshadow (NYX Golden Poppy eyeshadow), a warm yellow-orange eyeshadow (Juiced eyeshadow), a warm coral eyeshadow (Coral eyeshadow or NYX Tropical), a warm gold eyeshadow (Goldmine eyeshadow), black liner of choice, and black mascara of choice. To finish the look, I used Sunbasque blush with Enriched Refined Bronze to contour cheeks and had Rockocco lipstick with Strawberry Blonde lipstick and Tartlette lipglass on my lips.
You will need the following tools: a good blending brush (Philosophy Shadow brush), small crease brush (219), and a flat, short bristled brush to apply wet pigment.
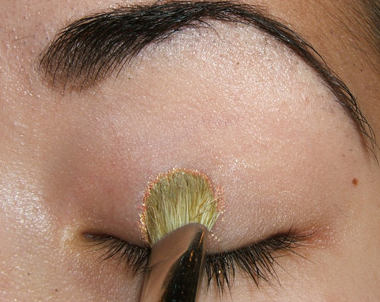
Using a semi-firm, flat bristled brush, put just a touch of water-based mixing medium on it, swipe it against the back of your hand to ensure it isn’t too wet, and then pick up some Melon pigment. Place all over lid area, making sure to only cover enough area so that your lid and just over the crease line is covered.

Like so.

Using you blending brush, pick up NYX Golden Poppy eyeshadow and place on the inner one-third to one-half of your eyelid.

This is what you should have.

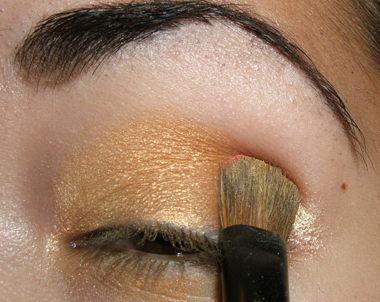
Again, using your blending brush, pick up Juiced eyeshadow and apply it to the middle of your eyelid, starting from around the crease area and pulling the color downwards to the upper lash line.

Like so.
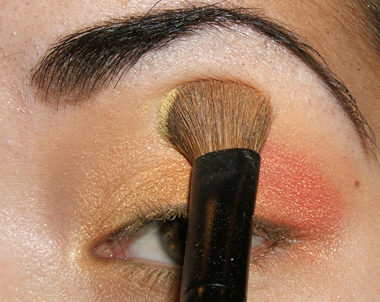
Using you blending brush, pick up Coral eyeshadow (or NYX Tropical eyeshadow) and place the color on the outer one-third of your brush beginning at the crease line and moving downwards toward the upper lower lash line.
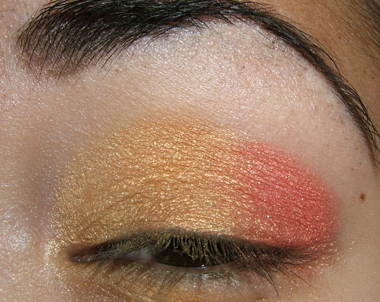
This is what you should get.

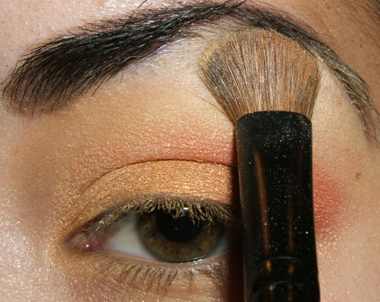
Picking up more of our coral color, place your blending brush horizontally against your crease to pull the coral color into the crease area.

Like so.
Using your blending brush, pick up more of Juiced eyeshadow and place your brush above the crease and move from the outside of the lid towards the inside of the lid to start creating a fading gradient as we move towards the browbone.
With the same brush that we have been using, pick up the soft yellow color and apply to the same area, only just a smidge higher.
Picking up more of the soft yellow color, apply all over browbone as a highlight.

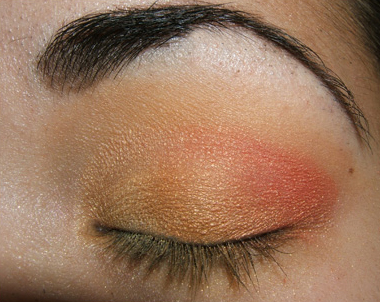
Take your blending brush and gently swish the brush sideways to help blend and fade the brighter coral color.
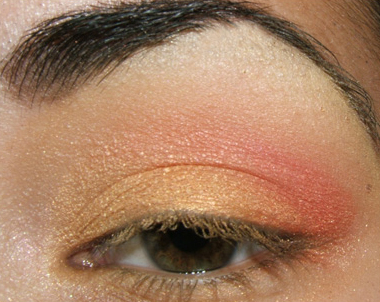
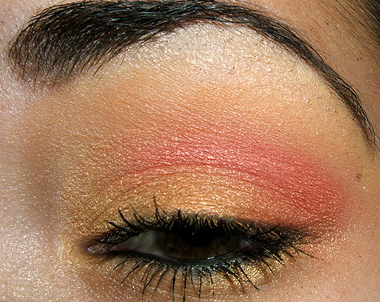
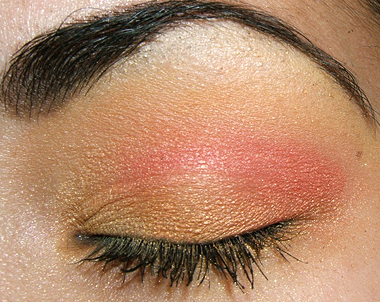
You should have something that looks like this.

This is the step where you fix any visible imperfections that you can see. I want to darken the coral crease color so I will repeat an earlier step by placing more coral eyeshadow into the crease area.
This is what we have now.

Using our 219 or small, fine pointed crease brush, pick up Goldmine eyeshadow and apply along the lower lash line to help make the eyes “pop.”
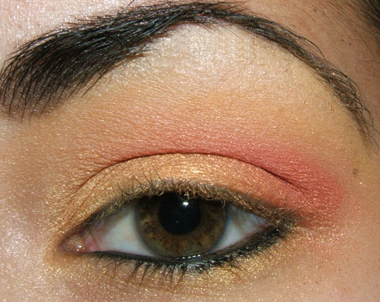
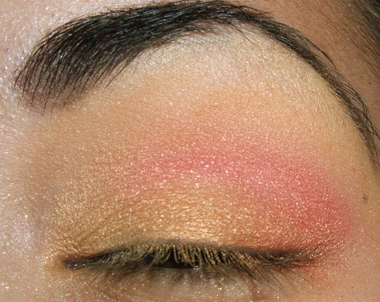
Add your choice of black liner (or colored liner) and favorite mascara to finish the look.
The final product:

Hey Christine,
This look is absolutely stunning, quite light but it compliments so well your complexion! I just love the shape of your eyebrows, did you do them yourself? I’m a desperate “eyebrow monster”, so if you have any tips…
Hi, Esperanza!
If you have a photo of your brows, I can try to show you a good shape through the wonders of Photoshop 🙂
But yes, I did mine myself. It’s taken years to get them to this point, but I’m pretty happy with their shape now!
Ohhh, how nice of you!! Here’s some pics of my “things” which called eyebrows: http://www.specktra.net/showthread.php?t=62299
Yours are simply perfect. With your help and the God of Photoshop, maybe I’ll manage to do something!
Thank you very much 😉
Hey there 🙂 I PMd you on Specktra with the pics!
temptalia
I love the look!!U look gorgeous!!!thanks for the tut =D
Thank you, love! I’m happy to make the tut 🙂
this is just lovely, however, the preview picture is of your naked eye!
oh noes!
xo
Thanks for pointing that out, Brittany!
so pretty!! now i gotta go look at them ALL! hahah. got any advice for a girl who cant see well (especially small things) on blending and getting the brush in the right place?
haha 😉 You might want to try a magnifying mirror? I know those are super helpful when I’m trying to tweeze my ‘brows, lol.
Hey, I noticed you used NYX products and I heard there were kind of like MAC products so where can you purchase them?
Hey Lynn! You can find them at nyxcosmetics.com and look for a store near you!
Wow. This look is breath taking. You eyes look so stunning and you have naturally beautiful eyes anwyay 🙂
Aww, thank you Anna! You’re a sweetheart 🙂
Looks kinda matte-ish. Is it just me? Looks amazing though!
Yeah, it’s semi-matte 🙂 Thanks!
Such a pretty eye, and perfect for spring and summer, too.
Thanks, Suzann 😀
Oh wow, this is stunning.. The pictures you make are so detailed.. I tried one of your tutorials (the black smokey eye), I did it a bit different though, and I was planning to make a picture to send it to you, but I couldn’t get a good one..
Thanks so much, Alma!
The best part about makeup is that you can make it your own, so I’m glad you did it a bit different 🙂
Anyone have an update on alternative products. It looks as though NYX products and Coral by Mac may no longer be available.
I like this look so much! do you think this look would work with goldmine and paradisco?
Thanks, Abby!
Oh yes, definitely!
i loved this sunset eye tutorial .. and it look good on your eye color ..
Thanks, Inas!
Simply Beautiful! I’ll have to try with with my Hello Kitty Mac quad!
Thanks, Tiffany!
I got it! Thanks so much! I’ve been looking for this particular look for some time now. It’s so great!
Cool! If I dont have an coral, like yours, what color would you suggest me use? (I HATE coral eyeshadow on myself!)