Tutorial - Neo Sci Fi Orange, Pink, and Brown Eye

I used Goldmode pigment (LE) on lid, Evening Aura eyeshadow (LE) on inner lid, Expensive Pink eyeshadow on middle of lid, Antiqued eyeshadow on middle/outer lid, Satin Taupe eyeshadow on outer lid and crease, Femme-fi eyeshadow (LE) on brow and above crease, Molten Sol liquidlast liner on upper and lower lash line, Graphblack technakohl on lower water line, and Plushlash mascara on lashes. I had Margin blush on cheeks. I wore Sci Fi Delity lipstick (LE) with Soft & Slow lipglass (LE).
** These are recommendations for dupes based on permanent colors available may not necessarily be identical; they are the closest I can think of!
Goldmode = Rubenesque; Evening Aura = Juiced + Nylon; Femme-fi = Shroom; Sci Fi Delity = New York Apple (blotted); Soft & Slow = Lust
Now, get step-by-step directions on how to get this look for yourself!
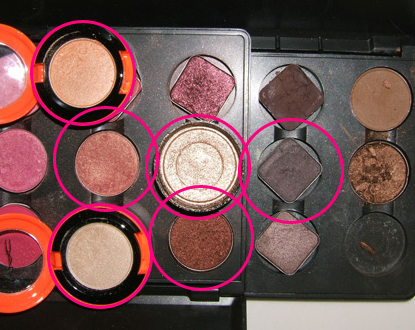
1. Here is an image of the colors we will be using. Top circle: Evening Aura; middle row: Expensive Pink, Gold Mode, Satin Taupe; bottom row: Femme-fi, Antiqued

2. Start with a bare eye.

3. Using mixing medium to dampen brush, apply Gold Mode pigment all over lid.
4. This is what you should have.

5. Apply Evening Aura eyeshadow using the 239 brush on your inner lid.

6. This is what you should have.
7. Apply Expensive Pink eyeshadow to the middle of your lid using the 239 brush.

8. This is what you should have.

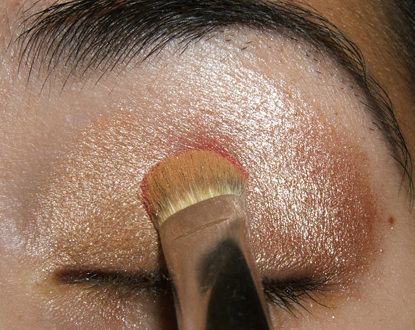
9. Apply Antiqued eyeshadow to your outer lid and outer crease.

10. Make sure to pull it into your outer crease.

11. This is what you should have.
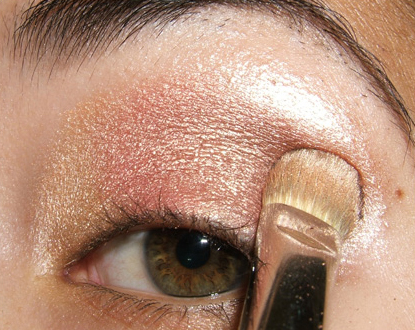
12. Apply Satin Taupe eyeshadow lightly into the very outer crease.

13. Get a little bit on the very outer edge of your lid.

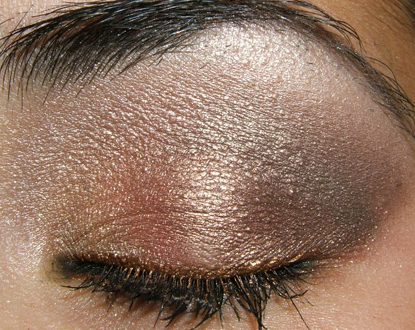
14. This is what you should have.

15. Apply Femme-fi eyeshadow with the 239 brush underneath your eyebrow to highlight the brow bone.
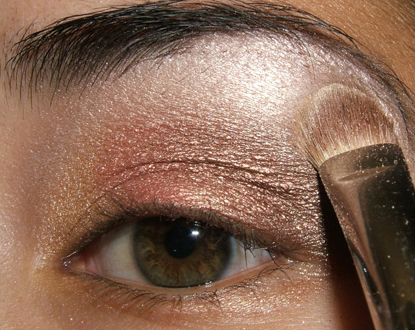
16. Pull the brush outwards to cover the entire area.

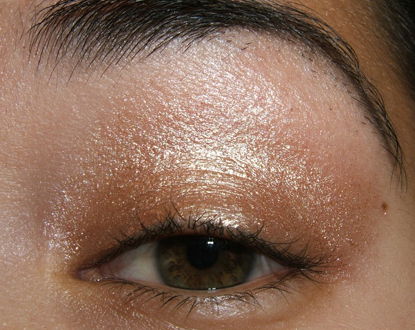
17. This is what you should have.
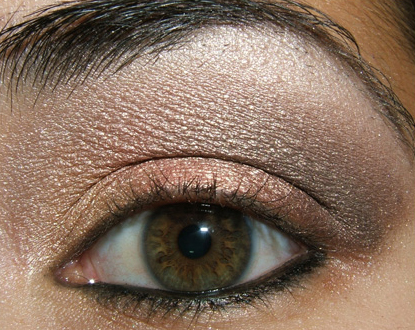
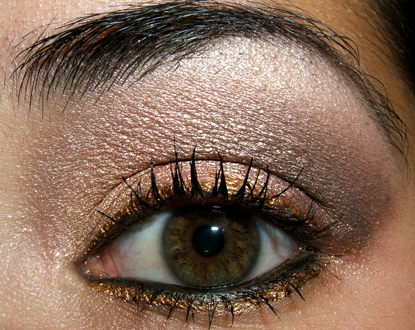
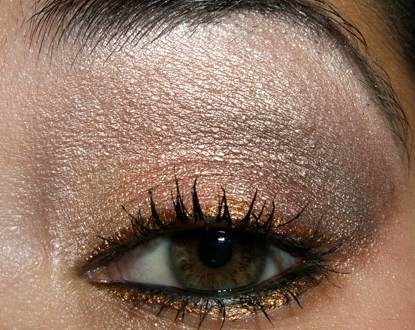
18. Add black liner of your choice to lower/upper lash line. Finish with mascara. Apply Molten Sol liquidlast liner to your upper lash line if desired.


Wow, you look great! Very good tutorial, I´ll try a (severly) toned down version of this look. LOL
Thank you for that!
Thanks, Nell! Hope you like your subtler version of it 😀
Thats Gorgeous Christine.
Thanks, Jennifer!
Wow you look very pretty! I love it:) I’ll definitely be using this one. I’m in love with that Molten Sol, its so pretty for summer.
Thanks so much! I love Molten Sol, even though this was the first or second look I ever used it with.
Hey,
Love the look. Looks great
Just wanted to ask where you get pallets like that from?
Thanks
Thanks so much! I get mine from MAC!
I love the gold eyeliner! I’d like to try that in silver. Very pretty!
Ohh, very interesting. I’d love to see it if you do try it!
Absolutely gorgeous! The Molten Sol liner really adds a lot to it, I love it! Thanks for the tutorial as well 🙂
Thanks, Ariele! Gotta love Molten Sol 😀 Such a pretty color.
I am loving the lip color!
Thanks, Jackie!
Great tutorial, Christine 🙂
Thanks, Stacey! 😀
Love the look!! I was wondering what if anything is a good subsitute for Molten Sol?
Thanks, Stephanie! Copper Sparkle pigment 🙂
sooo pretty!
Thanks, Jnie! 🙂
Beautiful, Christine! And I especially like this lip color on you. 🙂
Thanks, Kate! Can’t resist that lipstick!
thats liquid last makes your eye color POP!
Thanks, Tatiana! I have to remember to use it more often.
Wtfthatissomadlygorgeous. Off to the MAC store I go. 😀
Can you do a tutorial on blues too? I love blue! Hehe.
LOL, Miki!!
I’ve done a few blue tutorials, actually! Just go look in the past tutorials for eyes 😀
Good text for me!
Very nice looking,I will try to make up as you.
Thanks, Yuumi!!
Love it! ! On many other blogs they always talk about BLEND BLEND BLEND when you apply pigments and shadows….it seems like you do not blend but just apply…or am I missing something.
I am only asking b/c you do it so beautifully and make it look so easy. I know that when I blend sometimes I either muddy up the colors or lose the color vibrancy and have to reapply each of the colors again. What are you thoughts and what is the best method to make the colors look like a gradient effect. THank you and god bless 😉
Hey D! I definitely do some blending, but I think that a lot of colors just work well for you, and it’s about layering and softly creating gradients.
I find that I apply lightest to darkest, and I will often pull light colors into dark so that the lighter color helps to fade the darker one.
Really pretty, Christine. I can’t wait to try this one my own. I dunno if I can get it to look this nice, but it never hurts to try. 🙂
Have a good day!
Thanks, Karen! I hope you try it, and I bet you that it’ll look awesome on you 🙂
Hope you’re well!
This is absolutely beautiful, where did you learn how to do make up and how long have you been doing it? Thanks for this great look.:)
Thanks, Michelle! I just learned by practicing over and over again – I’ve been doing this kind of makeup for about four years now!
I’m going to try this one. I wish I hadn’t swapped Molten Sol! I think I’ll improvise!
Awesome! Copper Sparkle is a good dupe for it. I so rarely use Molten Sol, but I am glad I kept it!
Hiii Christine! your eyes looks so beautiful,you looks gorgeous specially in second pic,your brows,your eyes and kohl,your hairs ,your lips and mole every thing is perfect.really lovly!!!
Thanks so much, Sidra 🙂
wow, you’re amazing with makeup! you just gave me an idea what to do for dinner tonight! 😉
Aww, thanks! Did you end up using this for your dinner look, Sarah?
nice look >> you looks wonderful
would you plz make a yellow and silver mixed look coz i like ur looks and i wanna see how it will be with the yellow and sliver on eye and pink lipstick on lips
thanx
Thanks so much, Ana! I’ll try!
Your amazing and you really go step by step.
I love this look you are an inspiration to me and plenty others! I hope to learn as much as I can on here and hopefully be able to do my face like yours one day.
Thank you so much, Kathleen 😀 Happy to help!
Where can I find that makeup set of urs?
This is from MAC!
this is a fantastic tutorial!! i will bookmark it!
i always have a hard time trying to do eyeshadows on myself.
great job!
look forward to more tutorials!
Thanks so much, Michelle!
I love this look! it looks much more dramatic close up, but not as much so w/ the whole face. i’ll have to try it sometime. goodness knows i have enough makeup to try some version of this. i do have a question though – where do you get the mixing medium from? i’ve heard of it from mac, but i’ve never looked for it at the store. is it part of the pro-line?
Thanks so much, Christen! Glad you like it 😀 I make my own mixing medium (1 part glycerin, 3 parts water), but you can purchase it from the PRO store (water-based mixing medium).
I love it, love it, love it. Love it did I say that already. The way you started was so nice and bring but the finish product was smokey and beautiful. Can we be best friends now, we live close enough.
Aww, thank you 🙂