Tutorial: Smokey Eyes How-to

How-to: Smokey Eyes
You will need the following…
- Eyes: Soft Ochre paint pot (neutral base), Electra eyeshadow (bright silver), Silver Ring (dark silver), Carbon eyeshadow (matte black), Shroom eyeshadow (highlighter), Graphblack technakohl (black), Blacktrack fluidline (black), Zoomlash mascara (black)
- Cheeks: Well Dressed blush (soft cool pink), Dior Rose Diamond Skin Shimmer (pink highlighter)
- Lips: Sandy B lipstick (pinky nude), C-Thru lipglass (nude)
- Brushes: 266 (firm, angled brush), 226 (fluffy crease brush), 214 (smudge brush), 249 (flat, firm brush), 239 (fluffy shadow brush), 129 (dense blush brush)
Quick Directions: Define brows using a coordinating powder shadow applied with the 266 brush. Apply Soft Ochre paint pot all over the lid as the base with the 249. On the inner lid, apply Electra eyeshadow using the 239. Apply Silver Ring eyeshadow to the middle of the lid, extending to the outer lid. Darken the outer lid with Carbon eyeshadow using the 239. Darken crease with Carbon eyeshadow using the 226. Sweep Shroom eyeshadow underneath the brow bone to highlight. Smudge Silver Ring eyeshadow on the lower lash line using the 219 brush. Finish with Graphblack technakohl on lower lash line, Blacktrack fluidline on upper lash line, and Zoomlash mascara on lashes. Sweep apples of cheeks with Well Dressed blush using the 129, then highlight with Dior Rose Diamond Skin Shimmer with the 188. Apply Sandy B lipstick to lips, and then top with C-Thru lipglass for color and shine.
See step-by-step directions…
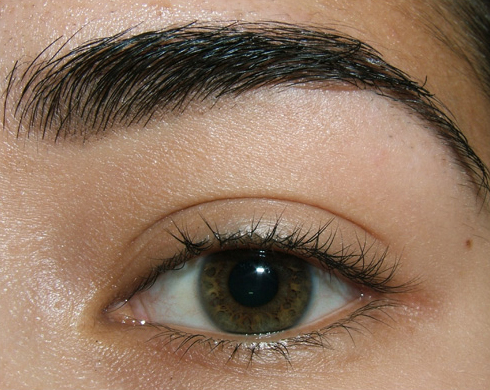
1. Start with a clean eye space.
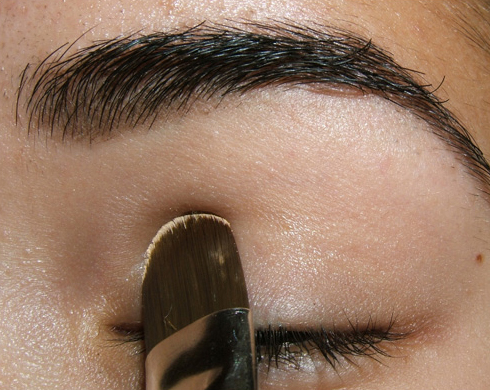
2. With your 249 brush, apply a thin layer of Soft Ochre paint pot all over the lid, from lash line to brow bone.
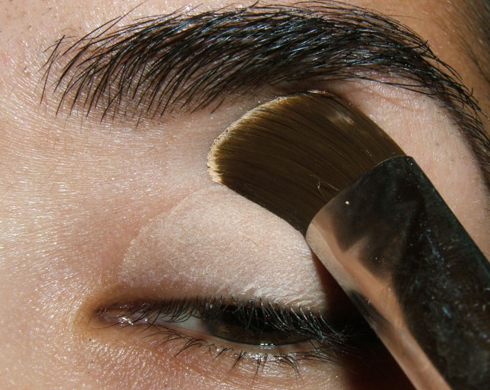
3. Make sure you apply the paint pot to your brow bone area.
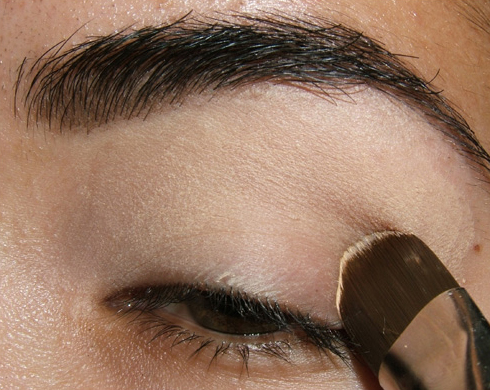
4. Brush out the base color to the outer lid.

5. This is what it should look like.
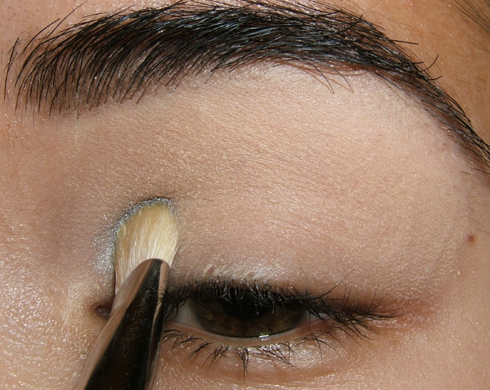
6. Pick up a good amount of Electra eyeshadow with your 239 brush. Apply it to the inner half of your lid.
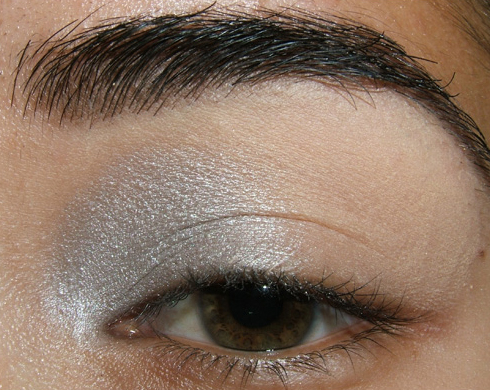
7. This is what it will look like.
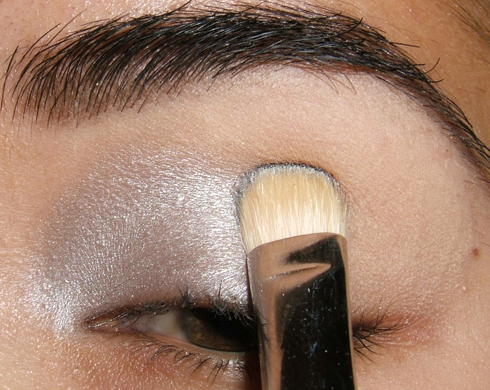
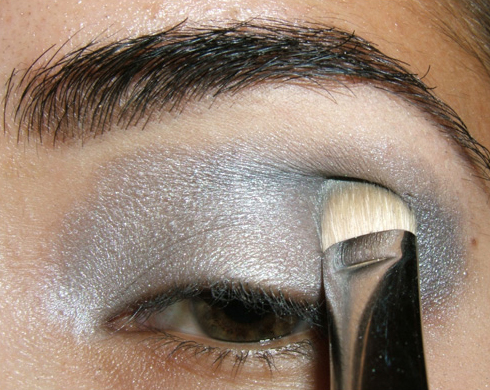
8. Using the same 239 brush, pick up Silver Ring eyeshadow. Apply it to the outer half of the eye lid.
9. This is how it should look like.
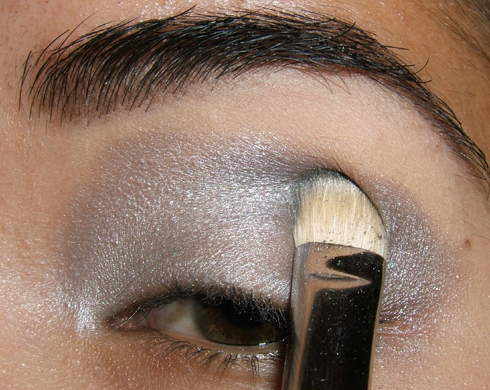
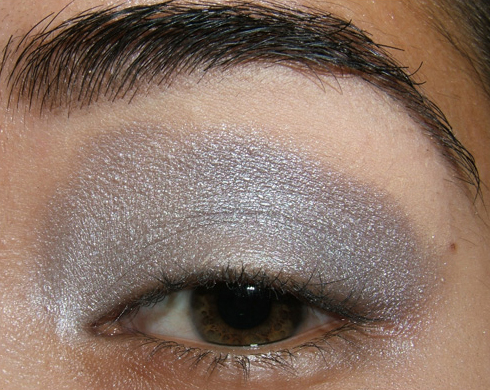
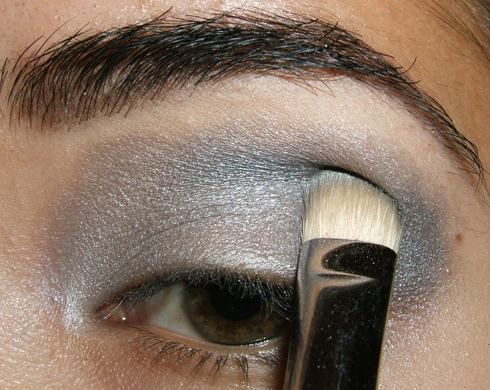
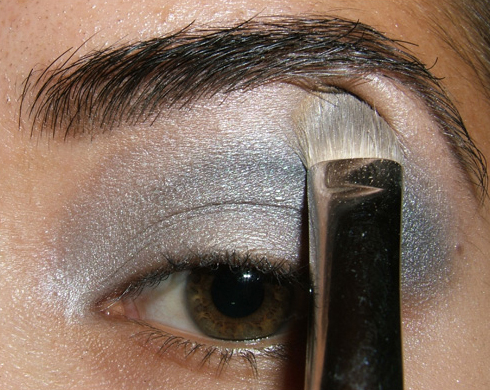
10. With the 239 brush, pick up just a little bit of Carbon eyeshadow. Hold the brush horizontally and begin applying it to the outer third of the crease.
11. Blend it into the crease by moving side-to-side.
12. Make sure you blend it enough so that the line isn’t too visible.
13. This is what you should have.
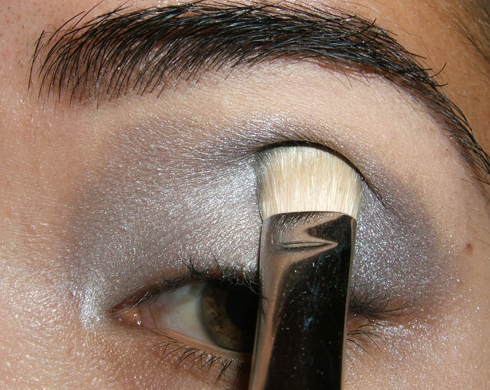
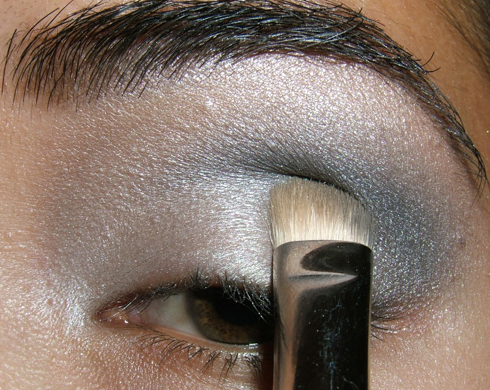
14. Repeat the same method with more Carbon eyeshadow.
15. Blend Carbon into the crease.
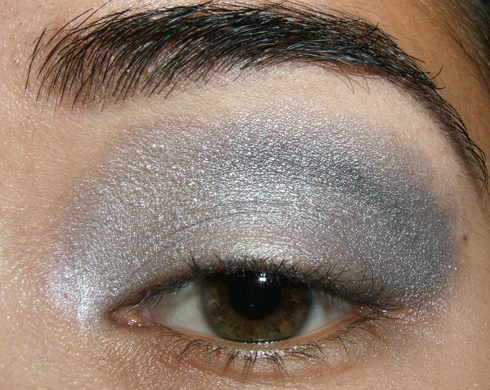
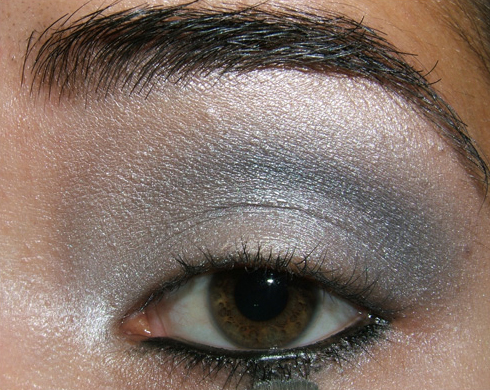
16. This is what it should look like.
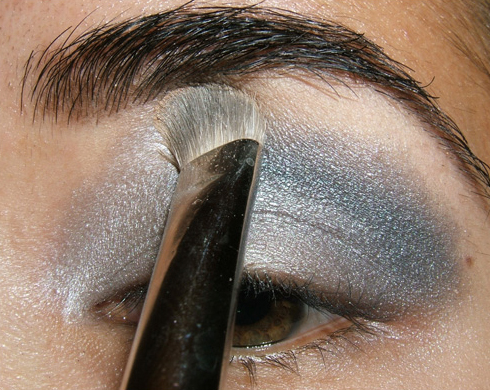
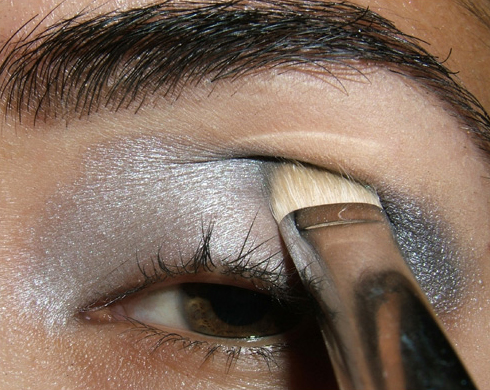
17. Apply Shroom eyeshadow with the 239 brush on your brow bone to highlight.
18. Brush out the highlight color so it applies evenly to the entire brow bone.

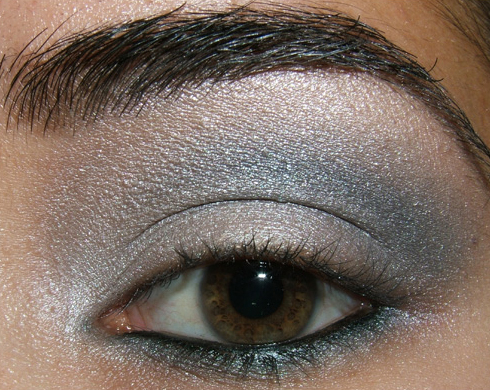
19. This is what it should look like.
20. Gently apply a dusting of Silver Ring eyeshadow to the lower portion of the crease, just to add more dimension.
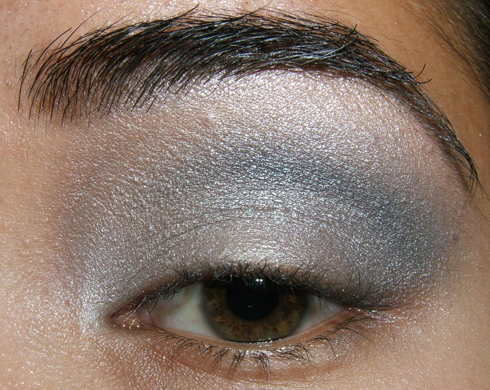
21. This is what you should have.
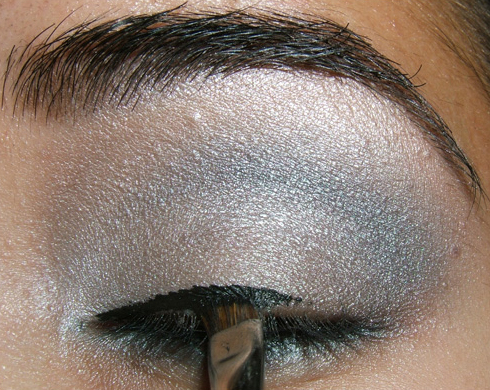
22. Apply intense black liner on your lower lash line if desired.
23. Use a firm smudging brush or a pointed pencil brush (like the 219) to smudge the black liner with Silver Ring eyeshadow.
24. This is how it should look.
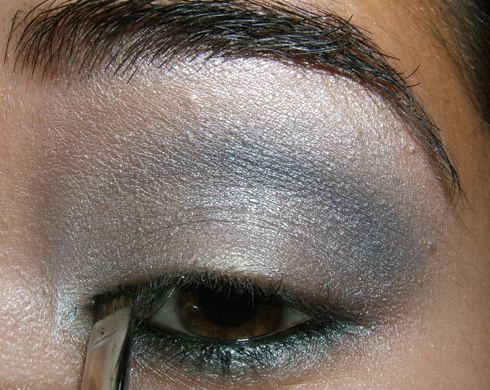
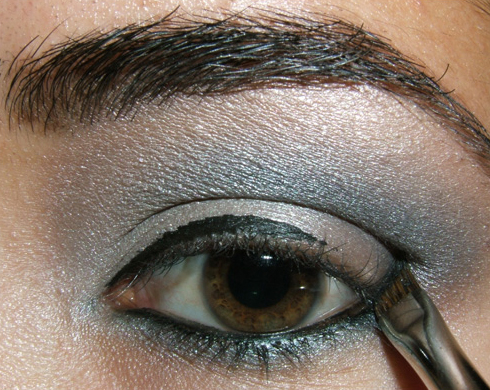
25. With the 266 brush, pick up Blacktrack fluidline. Begin applying it to the inner portion of your upper lash line.
26. In either quick, short strokes or one fluid stroke, move the brush towards the outer upper lash line.
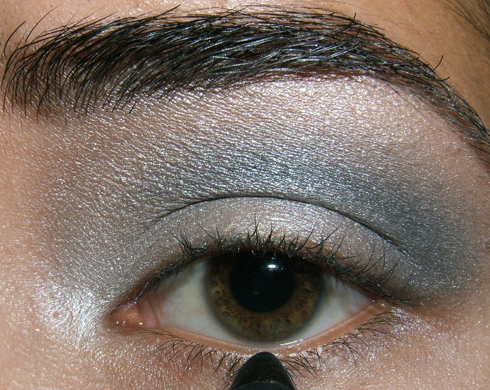
27. Take the 266 brush and create a diagonal line on your outer lid for the “wing” of the liner. You want it to be a continuation of your lower lash line, extending towards the end of your brow. (It’s like you were drawing a line to connect the two, but you don’t actually do so.)
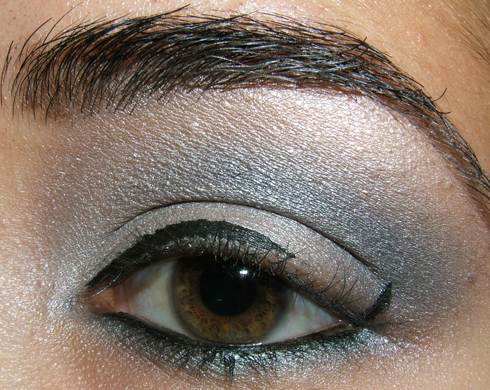
28. This is how it would look. (Albeit, mine is not quite perfect here.)
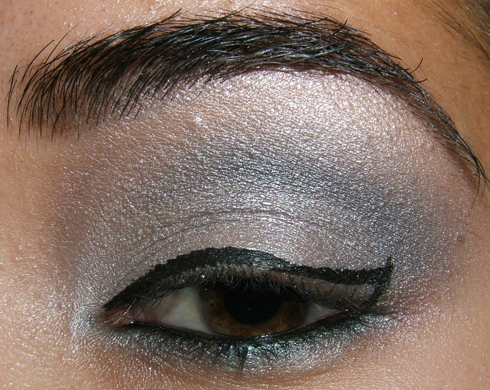
29. From the tip of the winged line, draw a curved line back to the middle of the lid — it should look something like the above image.
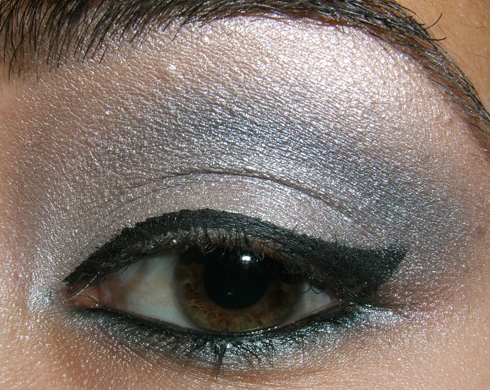
30. Fill it in with Blacktrack fluidline.
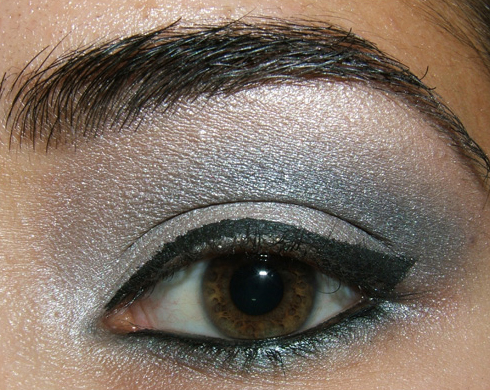
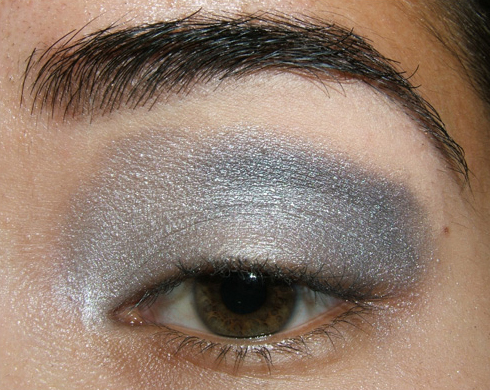
31. This is how it should look like. Add mascara and/or false lashes as desired to finish the eye.


Beautiful
Thank you!!
Is the lipglass what gives off the golden shimmers or is it the lipstick?
The lipstick!
I love this smoky silver eye, Christine! I have Electra, so I think I’ll go out and buy Silver Ring sometime. Thanks for the tutorial!
Thanks, Doreen! 🙂 I tried to use only permanent items, so I hope you can get Silver Ring sometime!
amazinggg
Thank you, Elisa! 🙂
Beautiful look!
Thanks a ton, Jenn!
I love this! More tutorials please!!
Thanks, Amanda 😀
very nice, I soooo struggle with trying to do the winged look…I just cant get my wings even 🙁
Thanks, Tanya! Me neither, it’s so tough 🙁
That is really pretty. I am impressed you only used a one brush for the majority of the lid!
Thanks, Emm! LOL, I am just so used to using the 239 for everything!
I’m soo surprised you accomplished that with ONE brush! lol. Looks great though!!
LOL! I am used to just using the 239. I forget to use other ones!
Thanks!
What a good tutorials for a somokey eye!
Thanks, Emma!
Christine, You used my tip I gave you, basically in exact words! ..I deserve credit!!! I’m glad you took my advice though & I hope it helped you. Remember to point your line TOWARDS the tip of your brow, when you put that little “dash” continuing your bottom lashline. Know what I mean?
This was actually done a week ago (originally posted here: http://www.temptalia.com/look-smokey-eyes-with-gray-and-silver), before I got your tip! I just don’t always get it right (because my waterline itches when I do it). It’s hard to practice to get it perfect every time when my lid swells up after every attempt 🙁
(There’s something about the interaction of the brush or liner pen or liner itself with my upper lash line that causes hypersensitivity, so my lid swells up and my eyes water.)
Oh, I see what you mean — I took the wording from my original Cat Eye Tutorial from eons ago (which, ironically, is better, LOL): http://www.temptalia.com/tutorial-cat-eye-liner-liquid-liner-tips-neutral-eye
I would have definitely credited you if I took it from you! I was re-writing based off of my old one, but I apologize for any familiarity. I don’t want you to think I would steal from you, because I hate when people do it to me, so please let me know if you feel you deserve the credit! 🙂
I just love the last picture, you look great!
Thanks, Meike!
very beautiful and thank you for the trick about the eyeliner (wing)
awsome… now i will have to try the look tomorrow when i’ll go out!!
p.s. – i love the step-by step explanations, and step by step pics!!
i LOVE the STEP BY STEP! i’m retarded when it comes to recreating looks of yours otherwise!
Thanks so much for the pic-by-pic tutorial!
Thanks soo much for the step by step tutorial. It really helps some like me who has a fair amount of eyeshadows, but has application issues, so alot of my shadows don’t get any love 🙁 Thanks again!
No problem, Tamara! Happy to help 🙂
I’m wearing almost exactly the same look today. I’m using NARS ashes to ashes, MAC softwash gray and NARS Night Clubbing with the winged liner! So pretty
Ohh, nice!! 🙂
Gorgeous amazing look! I ~always~ wondered how you got you eyeliner so perfect and now I know. I love this step-by-step type of post! 😀 Thanks so much!
Thanks, Brigitte! 🙂 I have a cat-eye tutorial as well!
Temptalia, that is an awesome how to. It’s nice to see exactly what you do and how it turns out after each step. Beautiful eyes!
Thanks, Sylvia! 🙂 I have a whole lotta tutorials from before, if you haven’t seen those yet!
Just lovely!
Thanks, Sasha!
So darn pretty! I really like it when you do step by step instructions and pics instead of the other way. Thanks for the review on the Essie nail polishes the other day, I bought all three:)
Thanks, Greta! 🙂
No problem! I’m glad you got ’em. I’m excited that you did!
wow i like how u did this tutorial better- step by step so we can see how u did it , thanx christine! looks beautiful! is sandy b l/s from the permenent line?
Thanks! Have you seen my other tutorials? There’s a whole section of them 🙂
Yes, I believe Sandy B is perm!
This is great Christine! Thanks to your looks and tutorials, I’m getting much better at smokey eyes, and have been complimented on my make up several times lately! 🙂
Thanks, Anitacska! 🙂 I am so happy to be able to help you at all! Yay for compliments!
Great tutorial Christine! Hopefully you can do more of those in the future *crosses fingers* I also love the liner tip for the cat eye look will be definitely trying that:-)
Thanks, Tami! 🙂 LOL, you can always go back to the archives and look at all the ones there in the mean time!
LOVE this! Thanks for that winged liner step by step method. I still haven’t mastered winged liner.
Thanks, Milan! 🙂
looks great!!!
Thanks, Jamie!
You’re a pro!
Thanks, Rachael 😀
Please tell me what camera you used to take these pictures, I love it. I can’t get my camera to take photos of my makeup like yours can.
Fuji Finepix E550!
YAY!
Thanks, Renee!
Please do more step by step turorials. This was so helpful!!
I have a whole bunch in the tutorials section 🙂
I love the look Christine..i’ll have to try went I go out!! Lovin the step by step pics and instructions
Thanks, Megan! I hope you like it when you try it!
i want to cry christine! 🙁 you look so beautiful w/ a smoky eye! i have medium blue eyes and when i try a smoky eye they get lost. could you please suggest an alternative for me? thanks! love, celeste
Hey Celeste! What are you using in your smoky eye?
You could try adding a little color, or maybe make it MORE silver vs gray/black!
it looks so pretty! thanks for sharing your tutorial~
Thanks, Rasilla 😀
this is such a nice look! and I loved how you “winged” the outer corners! and whatever you are using on your lips…I WANT IT! hehe
lol! Thanks, Sanny! The lip products are listed at the very top 😀
Great tutorial! You look gorgeous!!!
Thanks, Bunny!
Very pretty look, I definitely want to try something similar. Love the lips too, I think I wanna try it with a light pinky purple lip color. After I get the colors I would need, of course. And that might be a while with all the awesome collections coming up, lol.
lol! I tried to use ALL permanent colors in this look, so it can be a timeless tutorial!
I like how in the end, Carbon ends up looking like a dark, shimmery gray color. To be honest, I hate matte colors, I love shimmer and glitter and all of that. I think I wanna try something like Fun Fun or B Babe Lipstick and Perky Lipglass along with these eyes. Who knows, guess I’ll figure it all out when the time comes. =)
I need more mattes to round out all my shimmers and frosts, but I keep forgetting about it.
Fun Fun would be GORG with these eyes 🙂
Christine,
Awesome tutorial, this step by step is incredibly helpful to me and you look wonderful!
This is a stupid question because I dont know what I am doing when it comes to my eyes, lol but on step #14 do you mean to do the other steps before it again or to just do the carbon step over again? Anybody else who could answer would be great too!
Thanks, Jody!
Do the Carbon step over again 🙂 You’re basically just adding more Carbon because we want it darker!
Christine, what exactly do you use on your brows? They always look a little glossy and well set. :]
Beautiful smokey look!
Just Espresso eyeshadow, lol!
Thank you, Sally 🙂
This is a lovely tutorial. I will definetly try it out!
Thanks, Kellie! I hope that you do!
so pretty!
i love ittt
Thanks, Stefani 🙂
thanks for the tutorial! i’ve been waiting for one from you for quite a while already and i’m so happy u did the silver smokey eye! love the winged eyeliner tip too(Enkore made a very similar vid tutorial but she used the lower eyelid as the guide for the diagonal line for the wing)…I heart this one! i’m definitely going to try this one out on my birthday:)
I have so many taken, but I haven’t had the motivation/time/effort (lol) to crop them and write them up! Working on it!
Thank you! 🙂
I love how you didn’t use like 8 shadows to do this look. This is such a soft smokey eye. Love!
I tried to make it easy, simple, and use PERMANENT MAC colors 🙂
greys, dark greens and purples are your colors 🙂
Thanks, Mit 😉
Thanks for lesson especially on the eye liner I can never get that right I end up with all different versions of what it really should look like and gets me all stressed out I am about to atempt to do it now – wish me luck! I could need it! xxx
No problem! I’m happy to give you any help! Good luck!
HI Christine, I tried the eyeliner that you showed and it worked well, thank you ! I just wondered what is a good liner to line the waterline of the eye I use smoulder but it comes off before I walk out the house any tips?
So happy to hear this!
I like Feline or Graphblack – Feline was LE, but Graphblack technakohl is perm. Blacktrack fluidline also works well.
Hi x Thanks for advise, so can you put blacktract inside your eye? I have never tried using any fluid type eyeliner inside the eye always alittle nervous but I guess it will be better than khol that comes off as soon as you blink I always wonder what the stars use as they can walk around the red carpet and have the inside of their eyes lined but it still is there all the time ? I figure also they have someone following them down the carpet fixing their make up too! lol x great website by the way I just love it!
Yes, you can 🙂 Well, on your water lines, not necessary inside your eye, lol!
Thank you so much! I hope it works for you 🙂
I love it!!! Thanks so much for this!!!
Thanks, Andrea!
Awesome tutorial! will definitely be trying this out!
Thanks, Rose! I hope it works for ya!
this is so pretty! u look great! thanks christine 🙂
Yay! Thank you Wendy!
You are so freaking hot! I love smokey looks on you! I wish you’d always do the “cat eyes” effect, it adds to your looks. I like it on you! Did it swell this time?
Thnaks for sharing!
Thanks, Sash! Yep, it sure did. I usually don’t wear these kinds of looks long, just because I know it’ll happen!
Wow, this looks really good! I like the step by step thing you have going on
Thanks, Diana! 🙂
Just stumbled across your page a few days ago and I just wanted to say that I love your tutorials! The pictures are great.. they really help me!
Thanks so much, Roma!
just saw this lovely tutorial thanx so very much , its what i’ve been searching for ps. u look gorgeous
Thanks, Neli! 🙂
Hi Christine! I’m from South Africa and was recently a maid of honour to my cousin in her wedding. I came across your site and got the best tips on smokey eyes! From you I learnt the importance of BLENDING (but not overblending) and I did varying degrees of smokey looks for the other bridesmaid and the friend who did the hair.Both of them loved their makeup, and I did a sexy dramatic eye which lasted until the evening reception. Great advice & step-by-step tutorial! Thanks a million.
So glad to be able to help you! Thank you, Rosa!
It looks amazing!
This looks soooooo gorgeous on you!!
i really liked how it looks and it is a great tutorial.